Kreatywność w każdym zgięciu
Żuraw Origami
Złóż kwadratowy arkusz do tradycyjnego żurawia z 28 starannie ilustrowanych kroków.
- Łatwe
- 28 kroków
- Około 20 minut
- 1 arkusz kwadratowy
Paper: Jeden 6 × 6 w kwadracie (15 × 15 cm)Kamialbo papier Chiyogi.
Scenariusz i przeglądInThink Guide team
Przegląd redakcyjny:14 września 2026
Odesłania do opinii: Origami.me
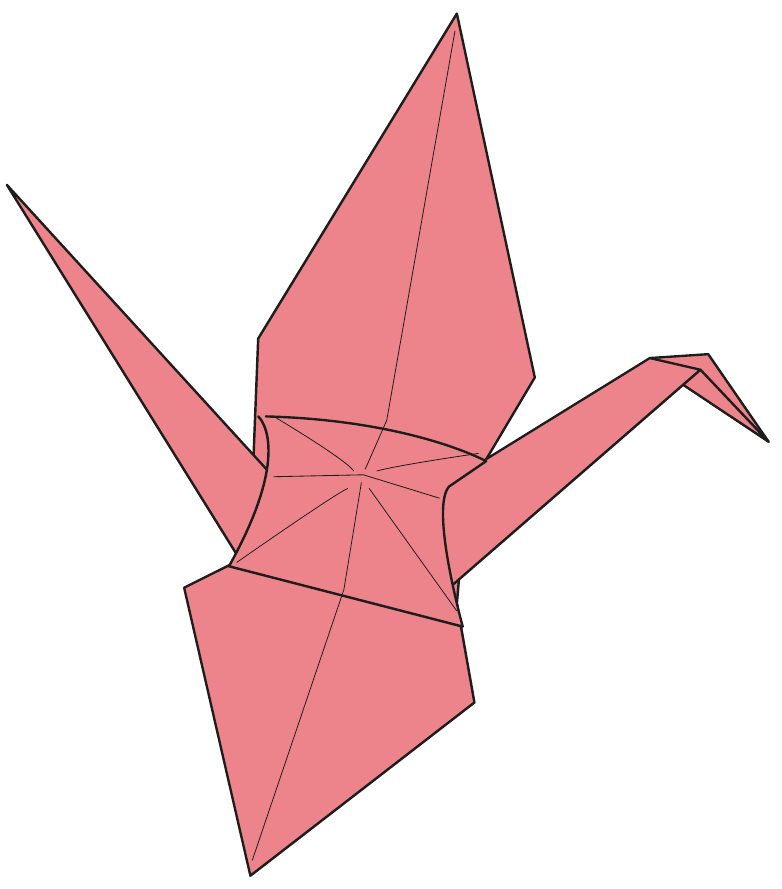
Żuraw gotowy!
28
numerowane kroki od kwadratu do żurawia
4
rozruszniki przez środek
15cm
kwadratKamipapier działa doskonale
0
potrzebne kawałki, kleje lub taśmy
Przed spasowaniem
Każdy diagram używa tych samych znaków. Naucz się ich raz, a reszta strony sama się przeczyta.
Pokryta linia
Złóż tutaj. Linia znika wewnątrz modelu raz złożone.
Zakrzywiona strzałka
W którą stronę podróżuje gazeta. Pętla strzałki oznacza obrócić model.
Strzałki stałe
Podnieść, otworzyć lub obrócić wskazany klap w kierunku strzałki.
Barwa i biel
Kolor jest z przodu prześcieradła, biały z tyłu.
Pierwsze cztery szczeliny są ostre i dokładne. Prowadzą one kwadratową podstawę i oba płatki, które kształtują dźwig.
Złóż żuraw
Krok1z28
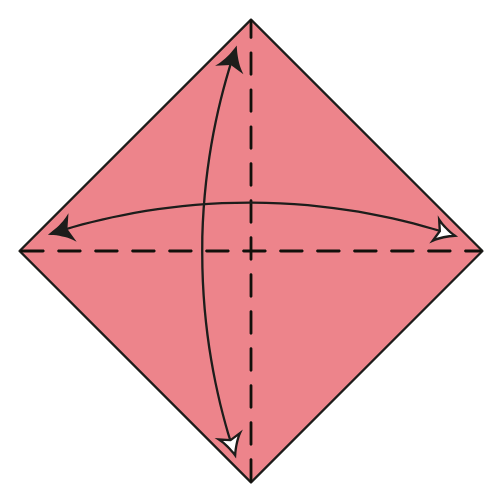
Krok01
Uszczelnienie obu przekątnych
Zacznij kolorową stronę w pozycji diamentowej. Złóż i rozwiń wzdłuż obu przekątnych.
Powinieneś zobaczyć.Płaski, kolorowy kwadrat z dwoma ukośnymi fałdami przechodzącymi przez środek.
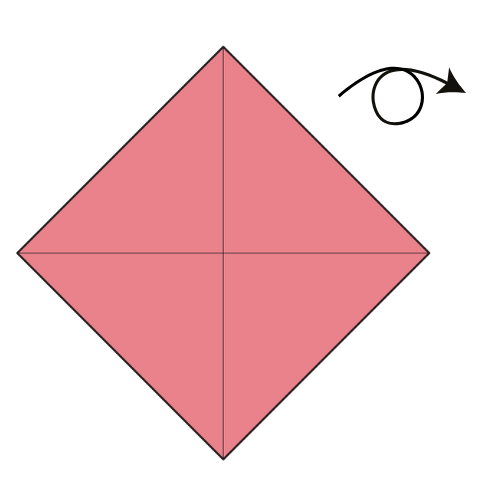
Krok02
Odwróć papier.
Przesuń prześcieradło tak, aby biała strona była zwrócona ku górze.
Powinieneś zobaczyć.Biała strona zwrócona ku tobie, z przekątnymi wciąż widocznymi.
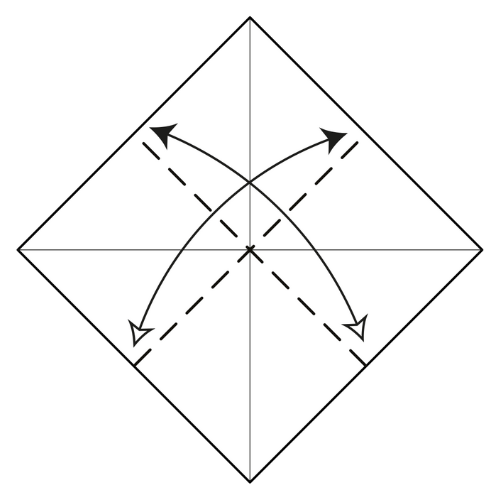
Krok03
Krease side to side
Złóż i rozwiń papier w połowie poziomo i pionowo.
Powinieneś zobaczyć.Cztery fałdy przechodzące przez środek: dwa przekątne i dwa proste.
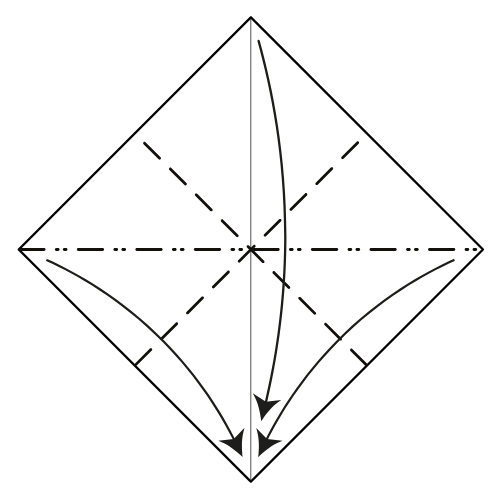
Krok04
Zwiń podstawę kwadratową
Sprowadzić lewe i prawe narożniki w dół do dolnego rogu, podczas gdy górny narożnik składa się nad nimi.
Powinieneś zobaczyć.Mały, warstwowy kwadrat z otwartym punktem na dole.
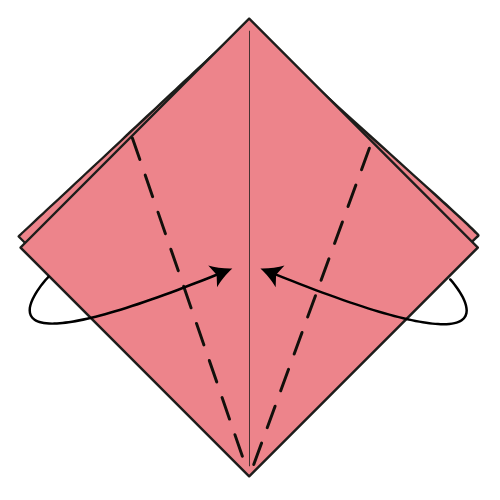
Krok05
Złóż przednie krawędzie do wewnątrz
Złóż lewe i prawe krawędzie górnej warstwy do pionowej linii środkowej.
Powinieneś zobaczyć.Kształt latawca z przodu kwadratowej podstawy.
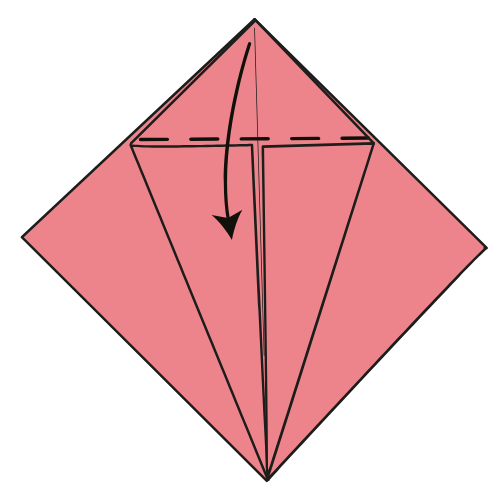
Krok06
Skreślić górny róg
Złożyć górny róg wzdłuż górnych krawędzi klap z kroku 5.
Powinieneś zobaczyć.Pozioma stłuczka w kształcie latawca.
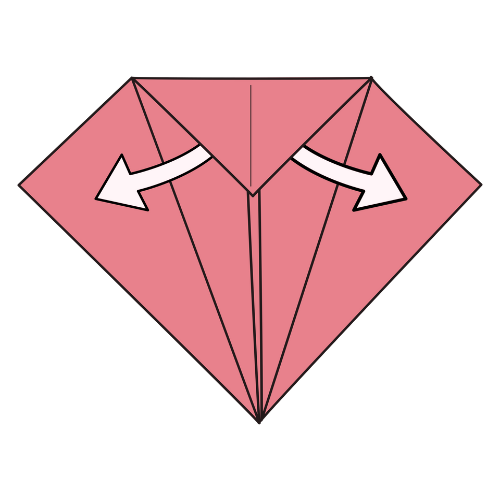
Krok07
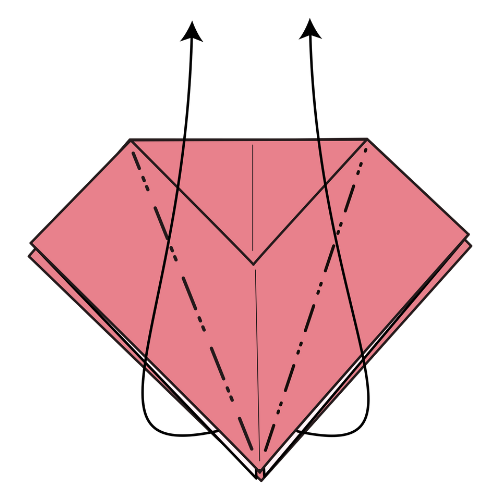
Rozwiń boczne klapy
Rozłożyć dwa fałdy wykonane w kroku 5.
Powinieneś zobaczyć.Kwadratowa podstawa otwiera się ponownie z trzema nowymi fałdami prowadnic.
Płatek w toku. 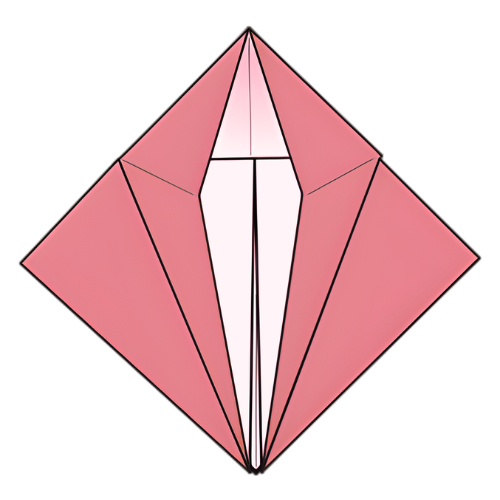
Krok08
Złóż pierwszy płatek
Podnieść górną warstwę i podnieść jej dolny róg, składając boki do wewnątrz wzdłuż skrzydeł.
Powinieneś zobaczyć.Długi, wąski diament skierowany w górę.
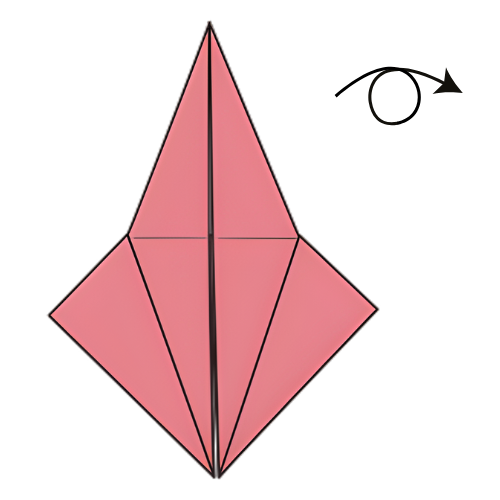
Krok09
Odwróć model
Odwrócić złożony model do pracy po drugiej stronie.
Powinieneś zobaczyć.Nietknięty kwadratowy klap zwrócony do ciebie.
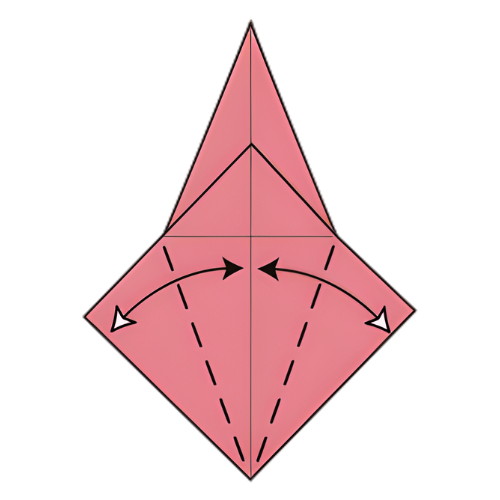
Krok10
Skreślić tylne krawędzie
Złóż i rozłóż lewe i prawe krawędzie do pionowej linii środkowej.
Powinieneś zobaczyć.Dwie ukośne skrzydełka na klapie.
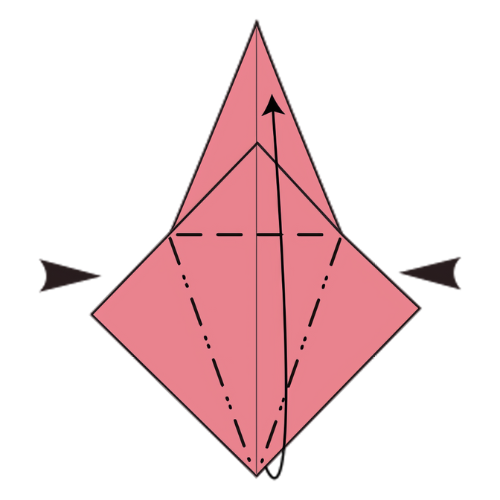
Krok11
Złóż drugi płatek
Podnieść górną warstwę i podnieść jej dolny róg, jak w kroku 8.
Powinieneś zobaczyć.Symetryczna podstawa ptaka z dwoma punktami długimi.
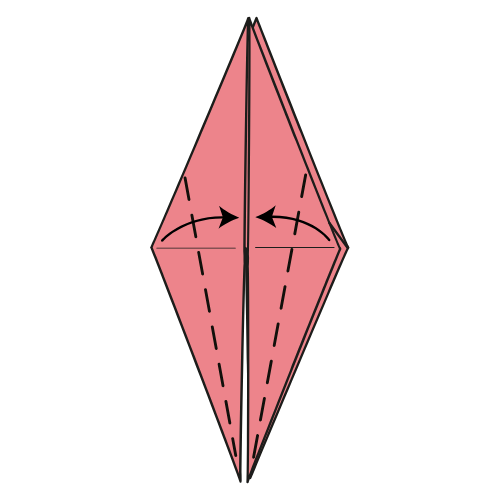
Krok12
Zawęź przód
Złożyć lewe i prawe dolne krawędzie przedniej warstwy do pionowej linii środkowej.
Powinieneś zobaczyć.Odchudzony latawiec z przodu bazy ptaków.
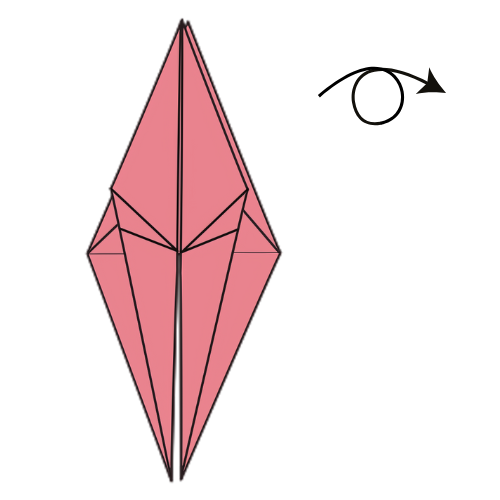
Krok13
Odwróć model
Przesuń model na drugą stronę.
Powinieneś zobaczyć.Szersze dolne krawędzie gotowe do zawężenia.
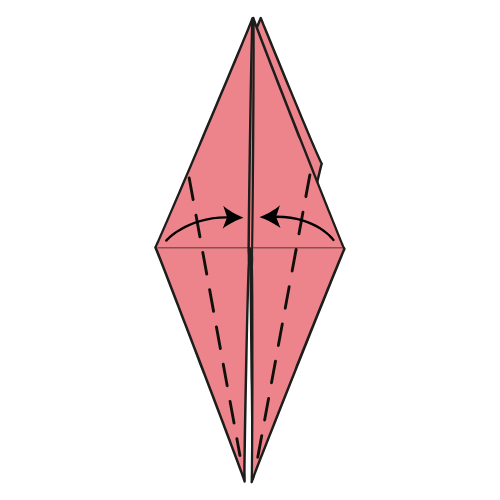
Krok14
Zawęź plecy
Złóż ponownie lewe i prawe dolne krawędzie do pionowej linii środkowej.
Powinieneś zobaczyć.Długi wąski diament, pasujący z obu stron.
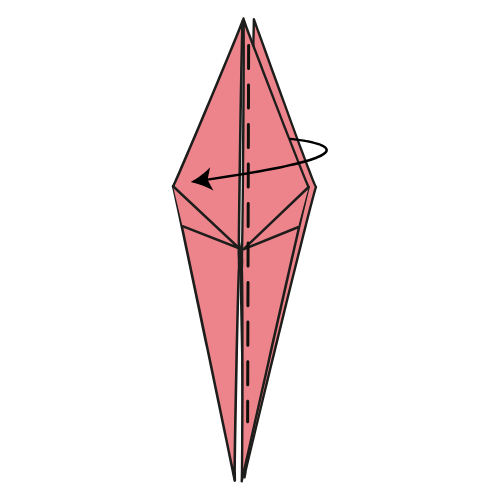
Krok15
Przesuń prawą klapę w lewo
Złóż górną prawą klapę w lewo, jak obracanie strony.
Powinieneś zobaczyć.Płynna wąska twarz z otworem środkowym przesunięta na bok.
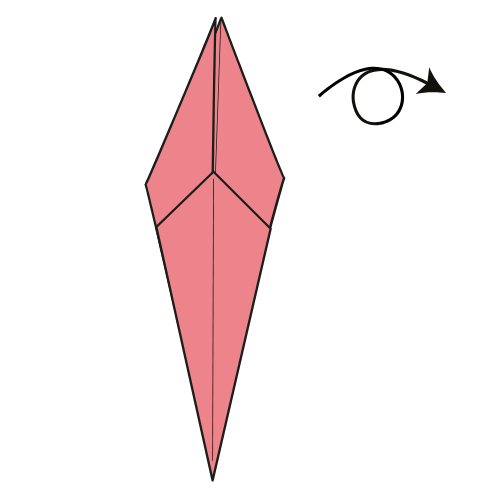
Krok16
Odwróć model
Przesuń model na drugą stronę.
Powinieneś zobaczyć.Pasuje wąska twarz z tyłu.
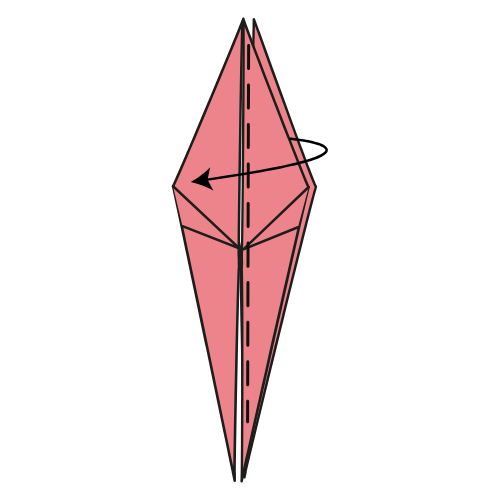
Krok17
Przesuń drugą klapę w lewo
Złóż górną prawą klapę w lewo, tak jak w kroku 15.
Powinieneś zobaczyć.Oba luźne punkty wewnętrzne ukryte między zewnętrznymi warstwami.
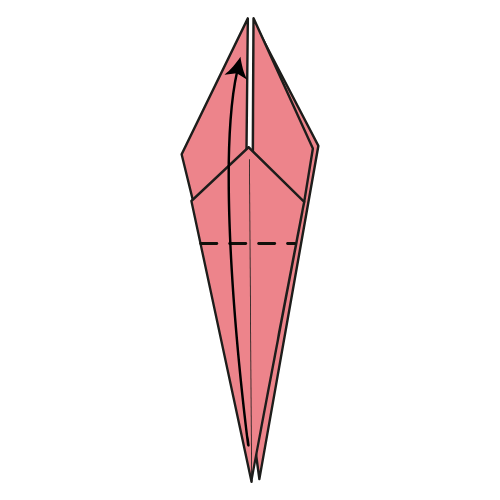
Krok18
Podnieść pierwszy punkt wewnętrzny
Złóż dolny róg górnego płata w górę wzdłuż istniejącego poziomego tłumienia.
Powinieneś zobaczyć.Jeden długi wewnętrzny punkt podniesiony między zewnętrznymi warstwami.
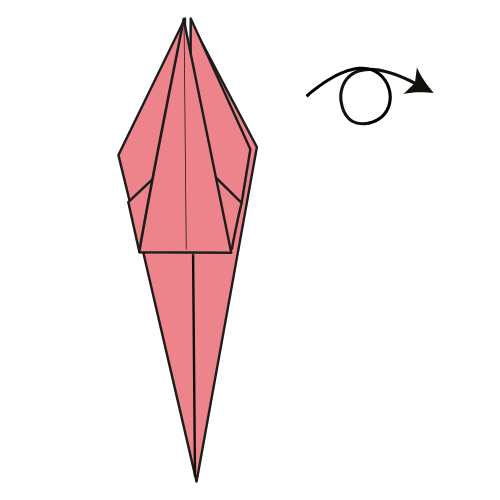
Krok19
Odwróć model
Przesuń model na drugą stronę.
Powinieneś zobaczyć.Drugi punkt wewnętrzny gotowy do podniesienia.
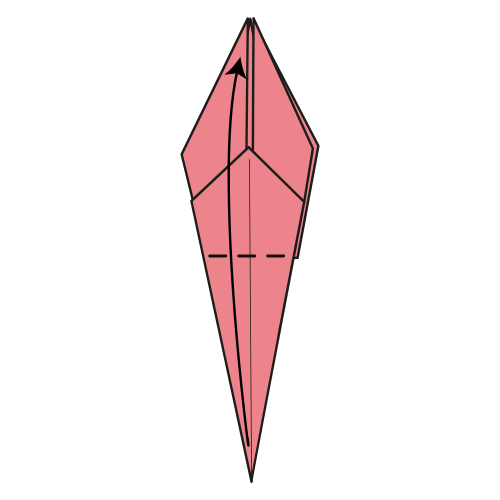
Krok20
Podnieść drugi punkt wewnętrzny
Powtórzyć ten sam fałd w górę co w punkcie 18.
Powinieneś zobaczyć.Dwa długie punkty wewnętrzne podniesione do tej samej wysokości.
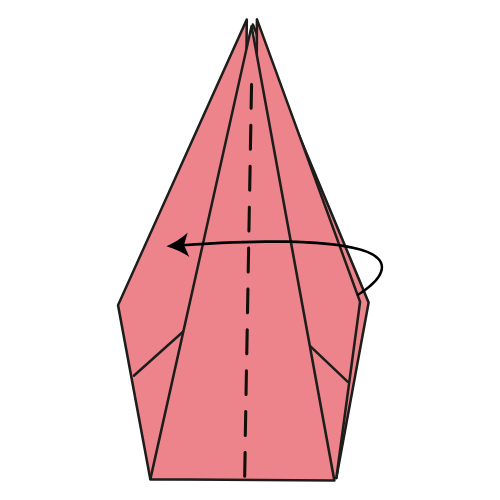
Krok21
Zamknij prawy klap
Złóż górną prawą klapę w lewo.
Powinieneś zobaczyć.Jeden podniesiony punkt zamknięty starannie między warstwami bocznymi.
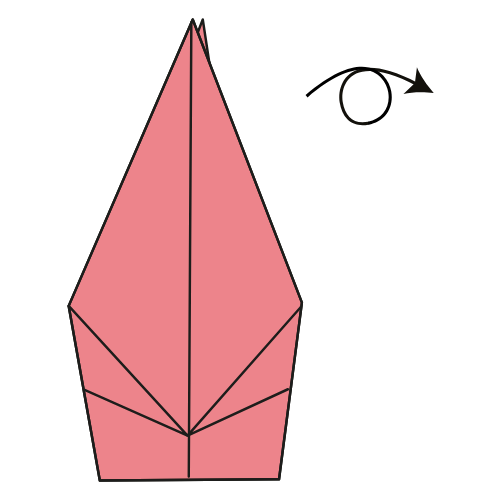
Krok22
Odwróć model
Przesuń model na drugą stronę.
Powinieneś zobaczyć.Pozostała otwarta strona przed tobą.
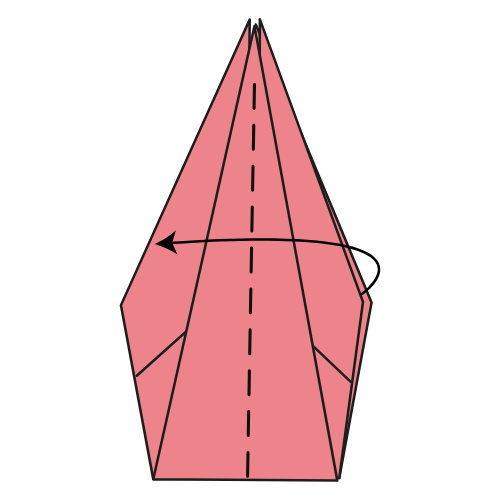
Krok23
Zamknij drugą klapę
Złóż klapę z prawej strony w lewo.
Powinieneś zobaczyć.Szerokie ciało z dwoma wąskimi punktami pomiędzy skrzydłami.
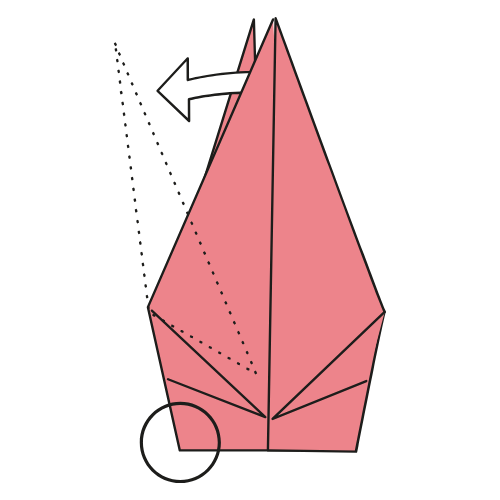
Krok24
Swivel- krotnie ogon lewo
Trzymać ogon między skrzydłami, obrócić go w lewo, wyrównać go z zewnętrzną krawędzią i spłaścić fałd.
Powinieneś zobaczyć.Ogon skierował się w lewo od ciała.
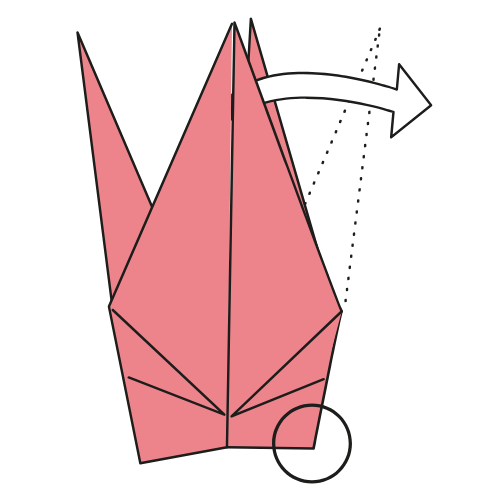
Zoomed widok po obu obrotowych fałdach. 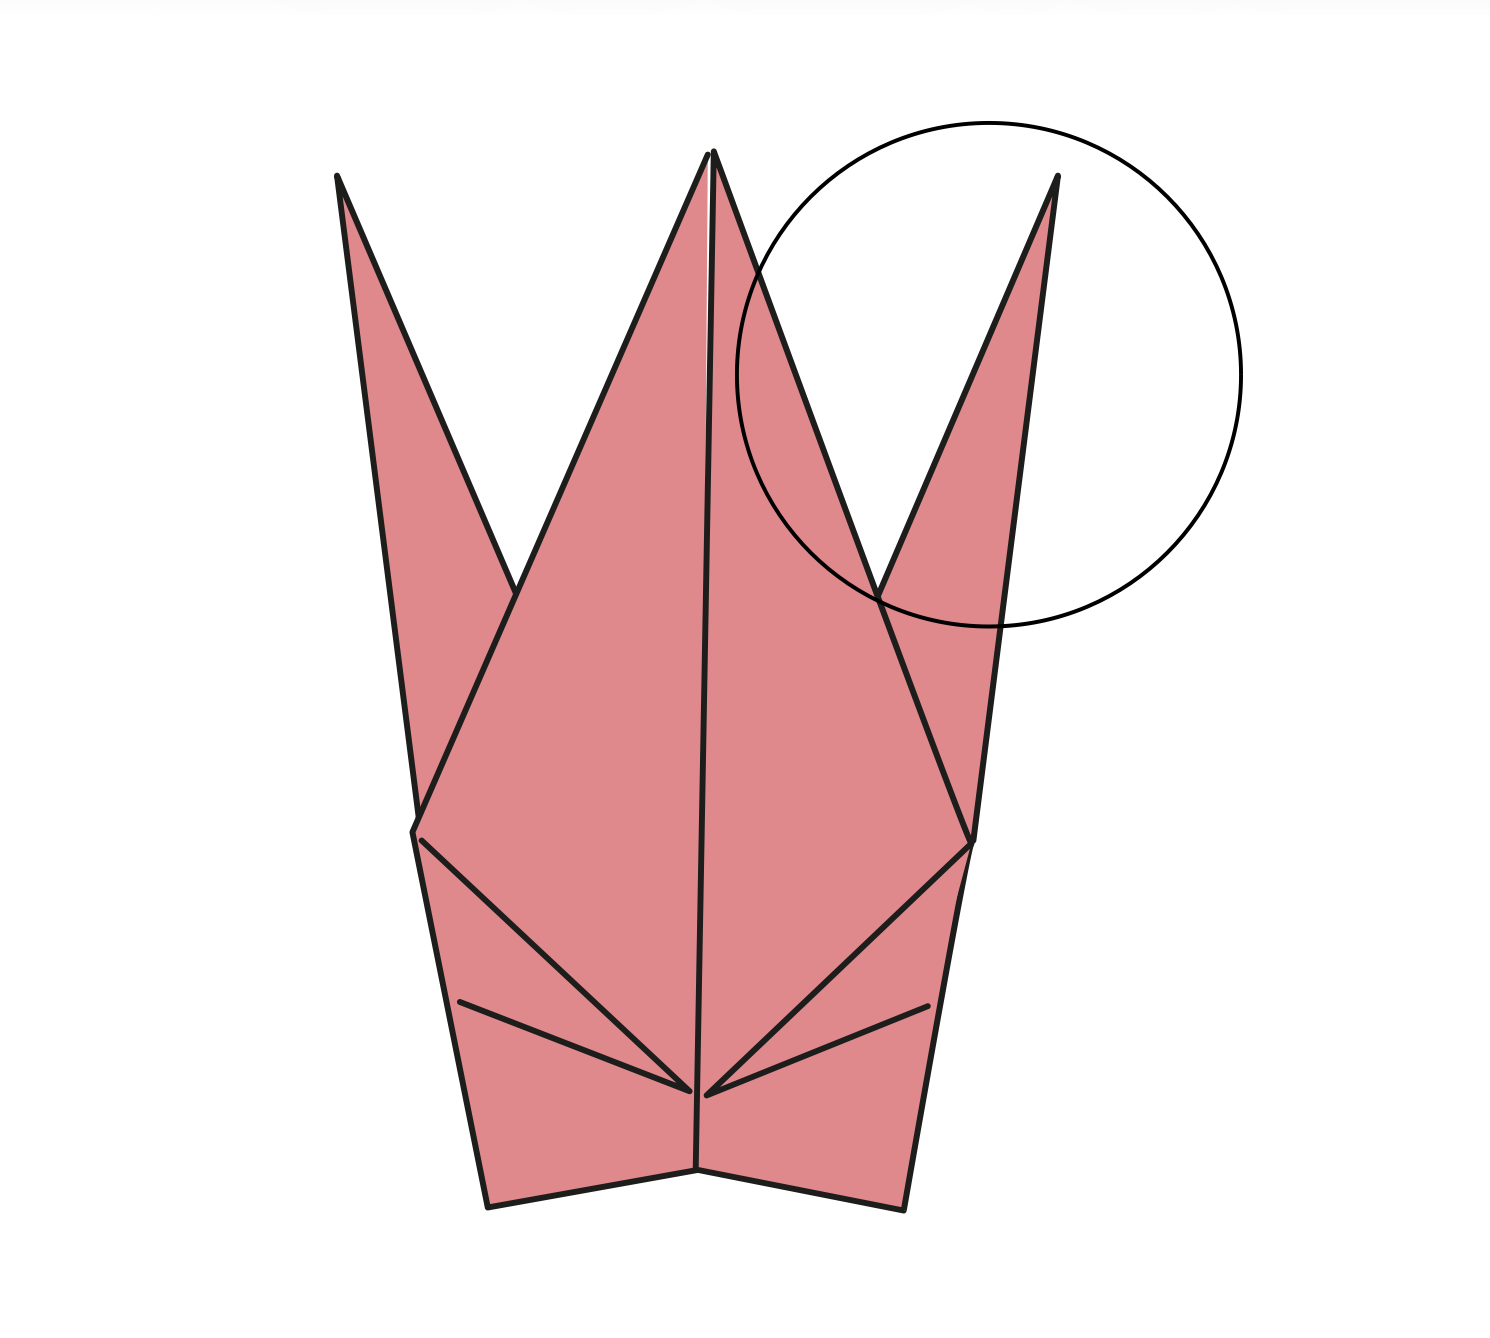
Krok25
Swivel- złożyć szyję w prawo
Powtórzyć ten sam obrót po prawej stronie.
Powinieneś zobaczyć.Szyja i ogon rozprzestrzeniły się na przeciwległe strony pod skrzydłami.
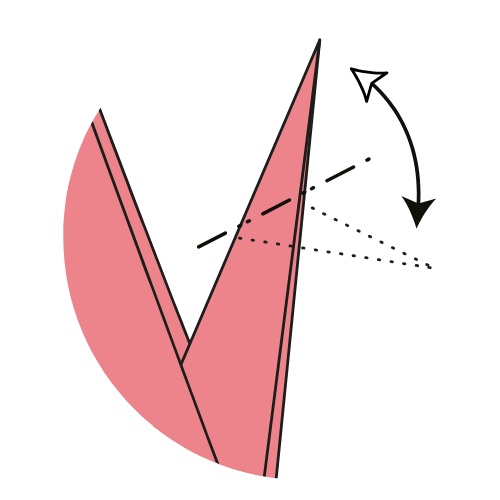
Krok26
Uszczelnić głowę
Góra - złożyć koniec szyi w prawo, mocno zgiąć, a następnie rozłożyć.
Powinieneś zobaczyć.Pęknięcie prowadnicy w miejscu zgięcia głowy; jego dokładne położenie może się różnić.
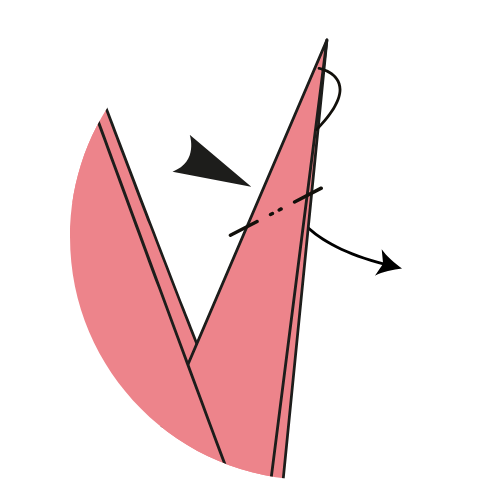
Głowa powinna wyglądać tak. 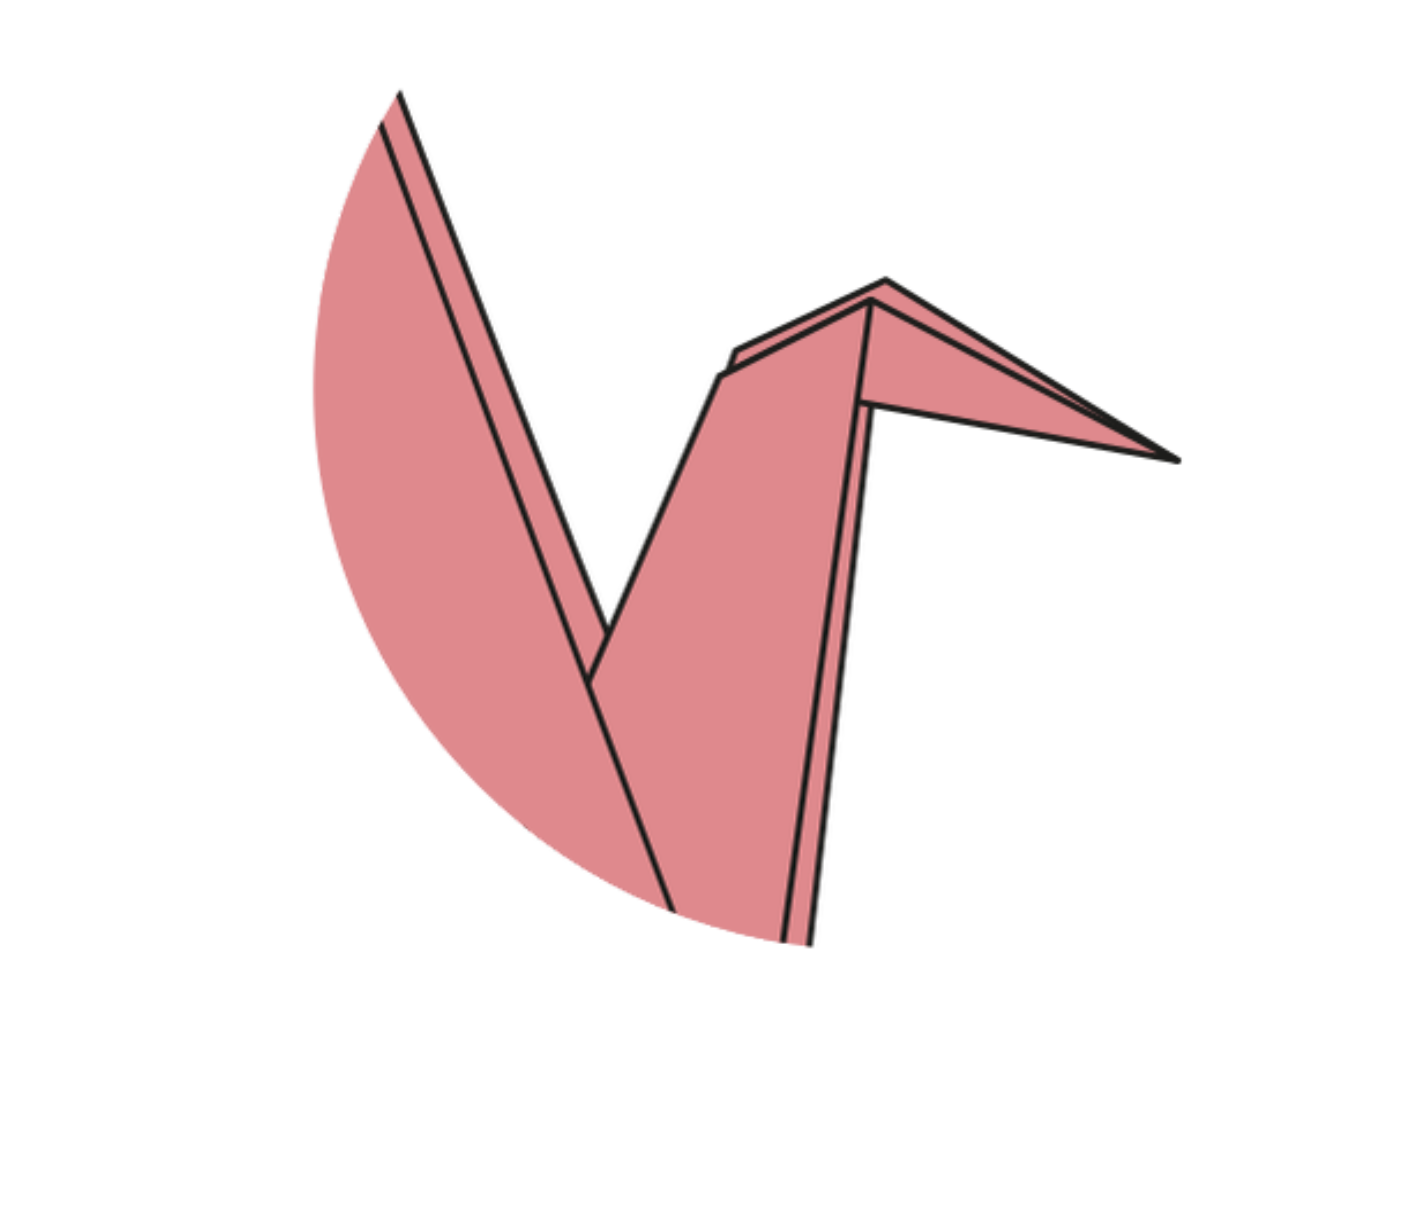
Krok27
Wewnętrzne odwrócenie głowy
Delikatnie otworzyć szyję i wcisnąć końcówkę do środka wzdłuż fałd od kroku 26.
Powinieneś zobaczyć.Mała główka pochylona od szyi.
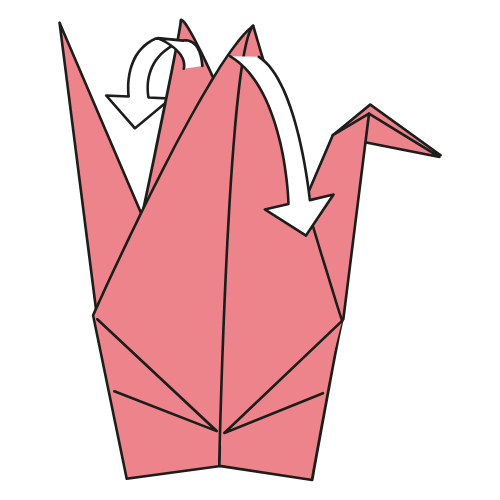
Krok28
Otwórz skrzydła
Delikatnie rozciągnąć dwa skrzydła i ukształtować ciało bez jego spłaszczenia.
Powinieneś zobaczyć.Wykończony żuraw z otwartymi skrzydłami, wyprostowaną szyją i ostrym ogonem.
Użyj klawiszy strzałek, aby przejść między krokami
Krok1z28: Uszczelnienie obu przekątnych
Żuraw gotowy!
Delikatnie otworzyć skrzydła i naostrzyć głowę, szyję i ogon szczeliny bez spłaszczenia ciała.
Tradycyjny design, przekątna Nick Robinson i wydana przezOrigami.me.
- Jeśli ciało się nie otworzy
- rozluźnić skrzydła, wspierając środek od spodu.
- Jeśli szyja zacznie pękać
- lekko otworzyć warstwy przed wykonaniem odwrotnego złożenia wewnątrz.
- Jeśli skrzydła wyglądają nierówno
- powrócić do kroku 28 i otworzyć obie strony o taką samą kwotę.