Creativity in every crease
Yoshizawa butterfly
Transform a square sheet into a butterfly with nine clear folds.
- Super easy
- 9 steps
- About 10 minutes
- 1 square sheet
Paper: One 6 × 6 in (15 × 15 cm) square of Kami or Chiyogami paper.
Written and reviewed by InThink Guide team
Editorial review: September 14, 2026
References consulted: Origami.me
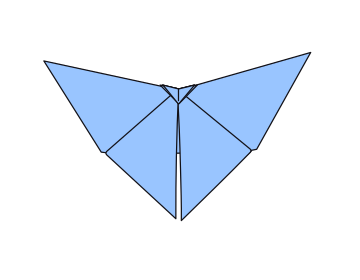
Your butterfly is ready!
9
folds from flat square to butterfly
4
creases you make before folding
15cm
square Kami paper works perfectly
0
cuts, glue or tape needed
Before you fold
Every diagram uses the same three marks. Learn them once and the rest of the page reads itself.
Dashed line
Fold along here. The line disappears inside the model once folded.
Curved arrow
Which way the paper travels. A dashed arrow means fold it behind.
Solid arrows
Push here with your fingers while the layers move apart.
Grey and white
Grey is the back of the sheet, white is the side facing you.
Work on a hard, flat table and press each crease with your thumbnail. Sharp creases are what gives the wings their shape.
Fold your butterfly
Step 1 of 9
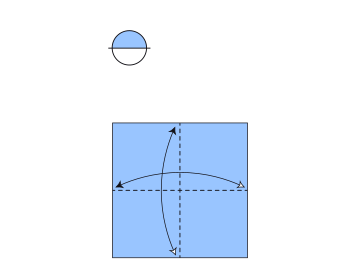
Step 01
Make two centre creases
Start with the coloured side facing up. Fold and unfold the paper in half horizontally and vertically.
You should seeTwo creases crossing at the centre of the square, the sheet flat again.
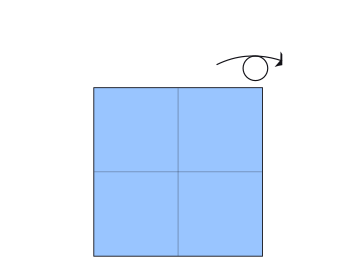
Step 02
Turn the paper over
Flip the paper so the uncoloured side faces up.
You should seeThe plain side facing you, with the two creases from step 1 still visible.
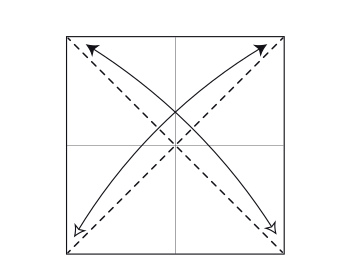
Step 03
Make diagonal creases
Fold and unfold the square along both diagonals.
You should seeFour creases in total: two straight and two diagonal, all crossing at the centre.
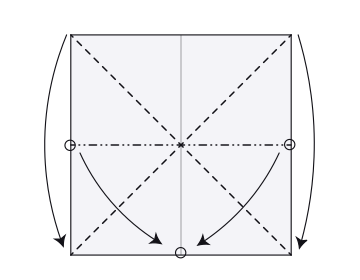
Step 04
Collapse the waterbomb base
Collapse the paper along the creases from steps 1 and 3 to form a waterbomb base.
You should seeA triangle made of four layers, with two loose corners on each side.
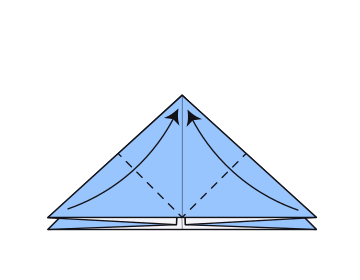
Step 05
Lift the front corners
Fold the top layer's two corners up so they meet at the top corner.
You should seeA diamond on the front, with two new folded edges meeting along the centre.
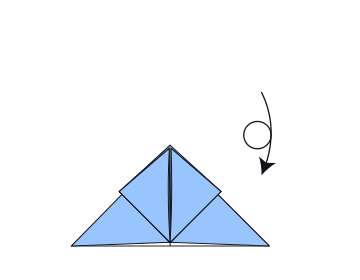
Step 06
Turn the model over
Flip the folded model to work on the other side.
You should seeThe plain back of the model, one large triangle pointing down.
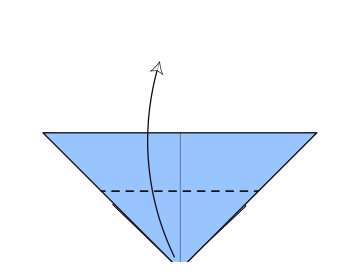
Step 07
Fold the lower corner up
Fold the top layer's bottom corner up, making sure its point extends beyond the top edge.
You should seeA point sticking out past the top edge of the model.
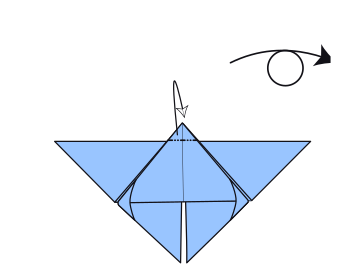
Step 08
Fold the point back
Fold back the corner that extends beyond the edge, then turn the model over.
You should seeA small folded tab holding the wings together at the centre.
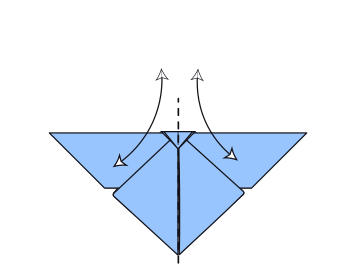
Step 09
Shape the wings
Fold both wings inward until they meet at the centre crease, then unfold them.
You should seeTwo broad upper wings and two pointed lower wings, with a crease down the middle.
Use the arrow keys to move between steps
Step 1 of 9: Make two centre creases
Your butterfly is ready!
Bend the wings up a little along the centre crease so the butterfly looks ready to fly.
The finished Yoshizawa butterfly is ready to display.
- If the wings will not stay
- press the centre crease firmly once more from the underside.
- If it tears at step 4
- collapse the base slowly and let the existing creases guide the layers.
- To make it hang
- thread a fine cotton through the body crease and suspend it from above.