Creativiteit in elke vouw
Origami kraanvogel
Vouw een vierkant vel in de traditionele kraan met 28 zorgvuldig geïllustreerde treden.
- Makkelijk
- 28 stappen
- Ongeveer 20 minuten
- 1 vierkant vel
Paper: Een 6 × 6 in het vierkant (15 × 15 cm) vanKamiof Chiyogami papier.
Geschreven en beoordeeld doorInThink Guide team
Redactieoverzicht:14 september 2026
Raadplegingen: Origami.me
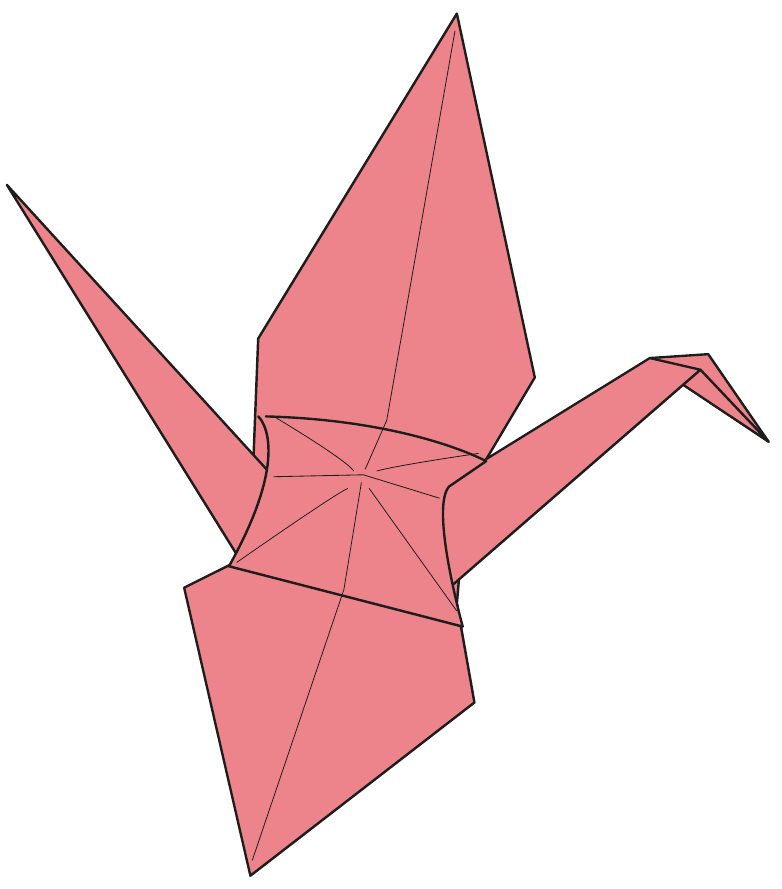
Je kraan is klaar!
28
genummerde stappen van vierkant naar kraan
4
beginnende vouwen door het midden
15cm
vierkantKamipapier werkt perfect
0
snijwonden, lijm of tape nodig
Voordat u gaat vouwen
Elk diagram gebruikt dezelfde markeringen. Leer ze één keer en de rest van de pagina leest zichzelf.
Gestreepte lijn
Vouw langs hier. De lijn verdwijnt in het model eenmaal gevouwen.
pijl gebogen
Welke kant de krant op gaat. Een gelijnde pijl betekent het model omdraaien.
Vaste pijlen
Til, open of draai de aangegeven flap in de richting van de pijl.
Kleur en wit
Kleur is de voorkant van het vel, wit is de achterkant.
Maak de eerste vier plooien scherp en nauwkeurig. Ze begeleiden de vierkante basis en beide bloemblaadjes plooien die de kraan vorm.
Vouw uw kraan
Stap1van28
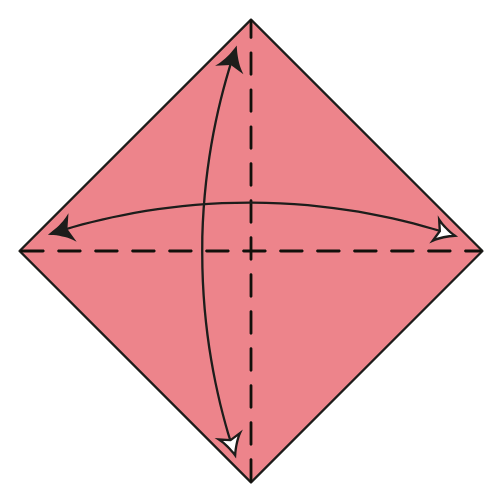
Stap01
Crease beide diagonalen
Start gekleurde kant omhoog in een diamant positie. Vouw en ontvouw langs beide diagonalen.
Je moet zienEen vlak gekleurd vierkant met twee diagonale vouwen in het midden.
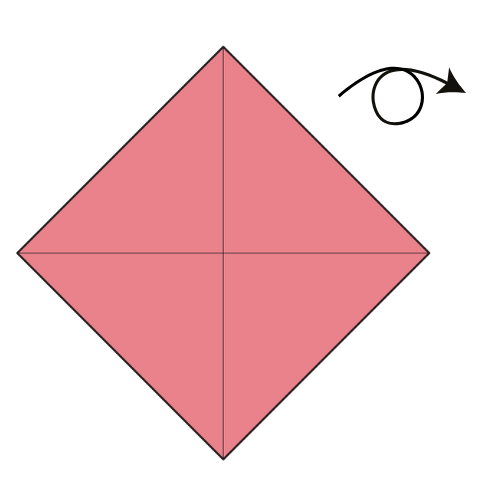
Stap02
Draai het papier om.
Draai het vel zodat de witte kant naar boven kijkt.
Je moet zienDe witte kant naar ons toe, met de diagonale vouwen nog zichtbaar.
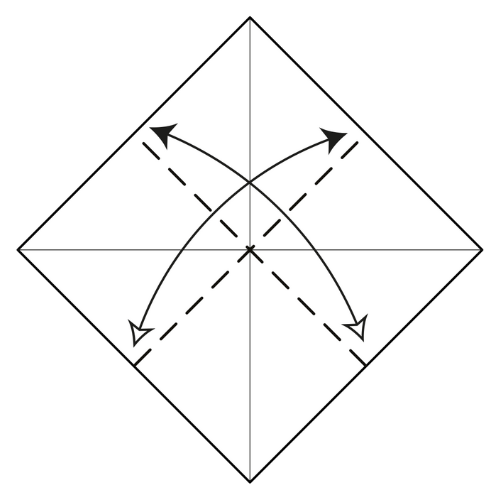
Stap03
Crease zij aan zij
Vouw en ontvouw het papier in de helft horizontaal en verticaal.
Je moet zienVier vouwen in het midden: twee diagonale en twee rechte.
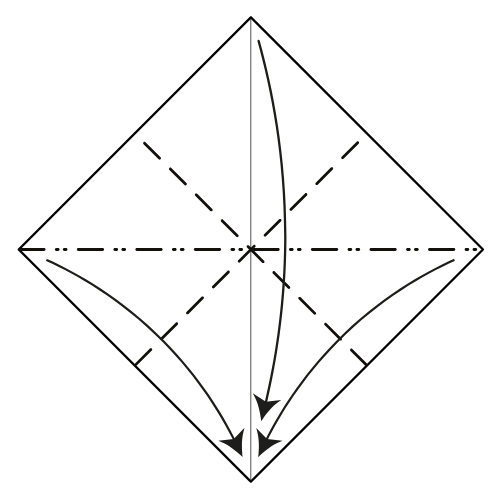
Stap04
Inklappen van de vierkante basis
Breng de linker en rechter hoeken naar beneden naar de onderste hoek, terwijl de bovenste hoek vouwt over hen.
Je moet zienEen klein gelaagd vierkant met zijn open punt onderaan.
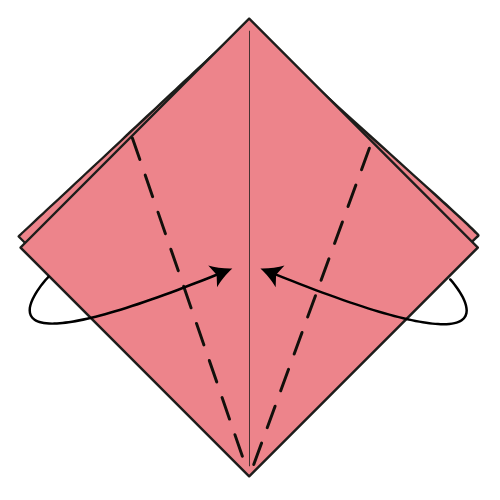
Stap05
Vouw de voorkant naar binnen
Vouw de linker- en rechterkant van de bovenste laag naar de verticale hartlijn.
Je moet zienEen vliegervorm aan de voorkant van de vierkante basis.
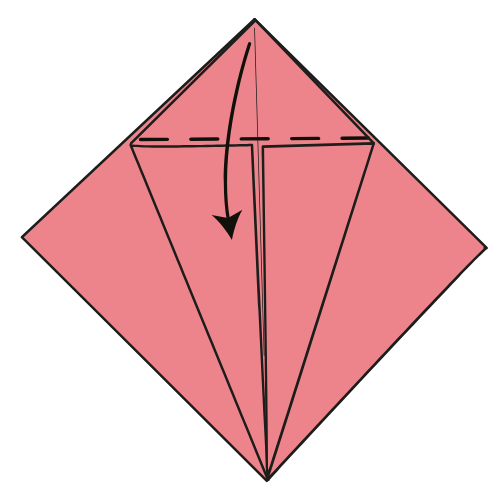
Stap06
Create de bovenste hoek
Vouw de bovenste hoek naar beneden langs de bovenste randen van de flaps vanaf stap 5.
Je moet zienEen horizontale vouw over de bovenkant van de kitevorm.
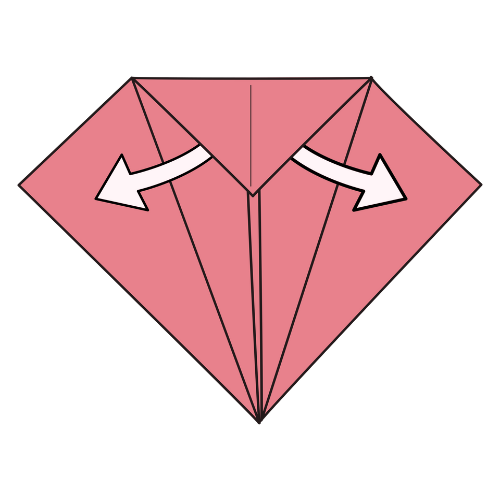
Stap07
Ontvouw de zijkleppen
Ontvouw de twee vouwen gemaakt in stap 5.
Je moet zienDe vierkante basis opent weer met drie nieuwe geleiders.
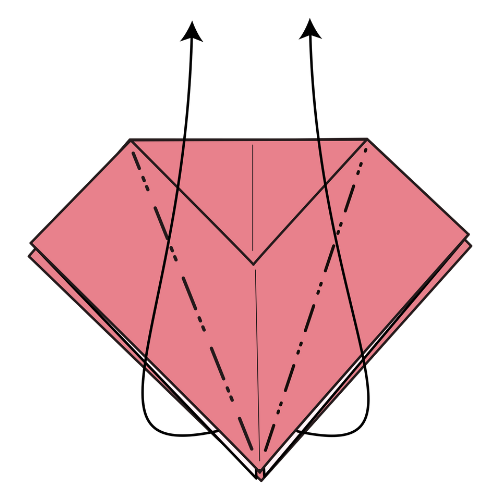
De bloemblaadjes zijn aan de gang. 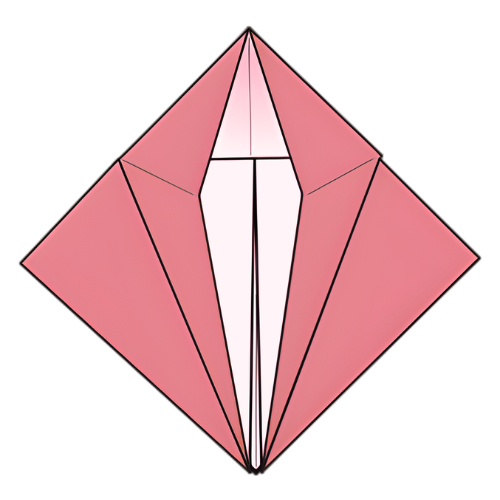
Stap08
Maak de eerste bloemblaadje vouw
Til de bovenste laag en breng de onderste hoek omhoog terwijl het vouwen van de zijkanten naar binnen langs de vouwen.
Je moet zienEen lange, smalle diamant die naar boven wijst.
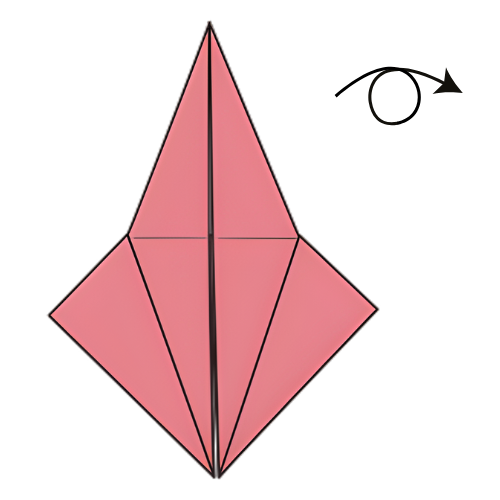
Stap09
Draai het model om
Draai het gevouwen model om en werk aan de andere kant.
Je moet zienDe ongerepte vierkante flap naar je toe.
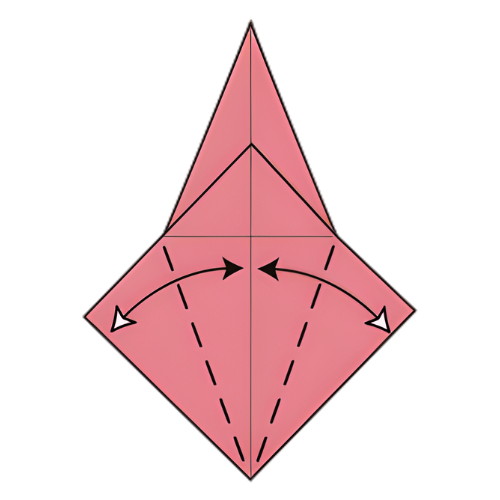
Stap10
Create de achterkanten
Vouw en ontvouw de linker- en rechterranden naar de verticale hartlijn.
Je moet zienTwee diagonale geleidingsplooien op de achterflap.
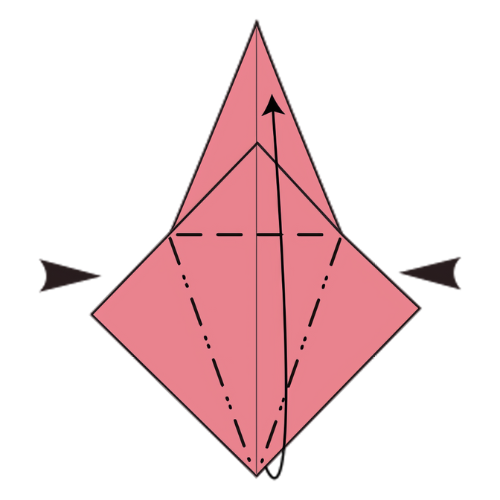
Stap11
Maak de tweede bloemblaadje vouw
Til de bovenste laag op en breng de onderste hoek omhoog zoals in stap 8.
Je moet zienEen symmetrische vogelbasis met twee lange punten.
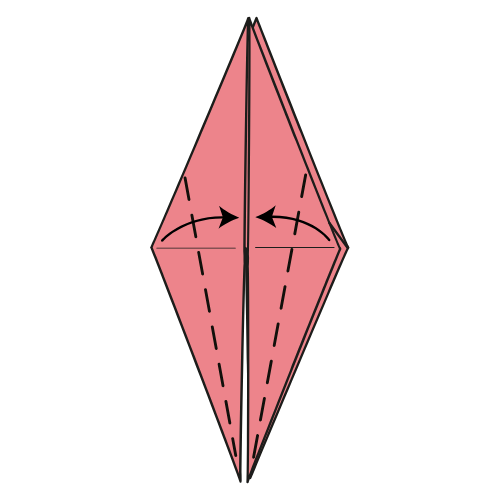
Stap12
Vernauw de voorkant
Vouw de linker en rechter onderkant van de voorste laag naar de verticale hartlijn.
Je moet zienEen slankere vlieger op de voorkant van de vogelbasis.
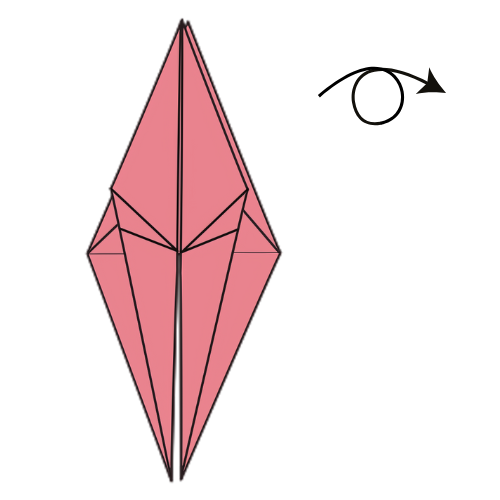
Stap13
Draai het model om
Draai het model naar de andere kant.
Je moet zienDe bredere onderranden zijn klaar om vernauwd te worden.
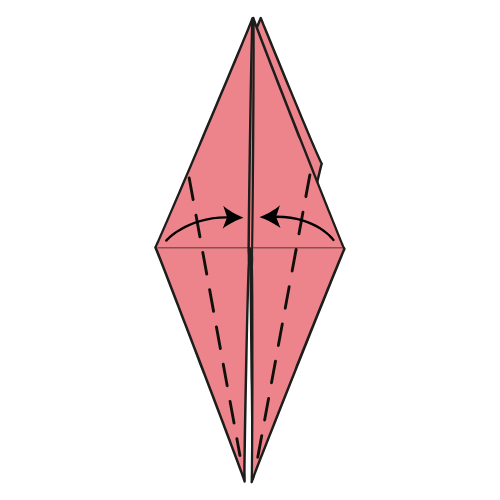
Stap14
Smal de achterkant
Vouw de linker en rechter onderkant weer naar de verticale hartlijn.
Je moet zienEen lange smalle diamant, die aan beide kanten bij elkaar past.
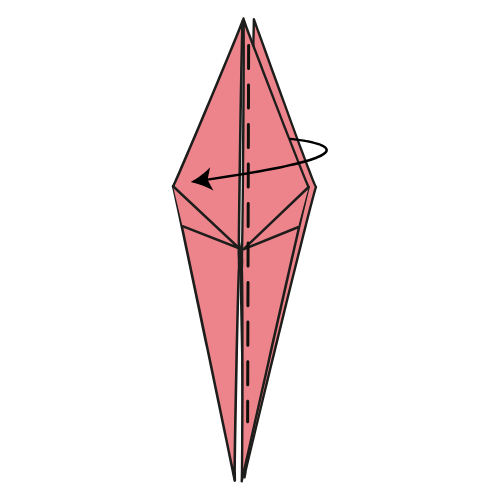
Stap15
De rechterflap naar links verplaatsen
Vouw de rechterbovenflap naar links als het draaien van een pagina.
Je moet zienEen glad smal gezicht met de middenopening verplaatst naar de zijkant.
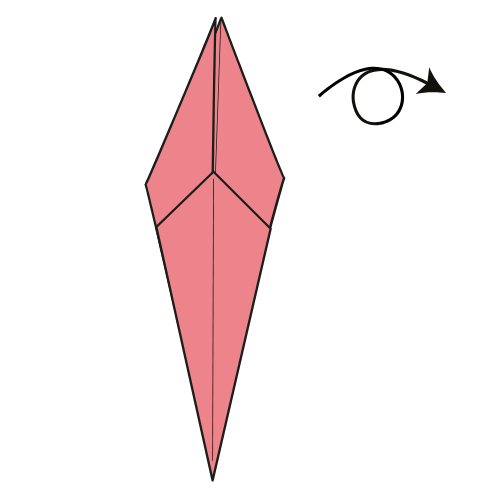
Stap16
Draai het model om
Draai het model naar de andere kant.
Je moet zienHet bijpassende smalle gezicht op de achterkant.
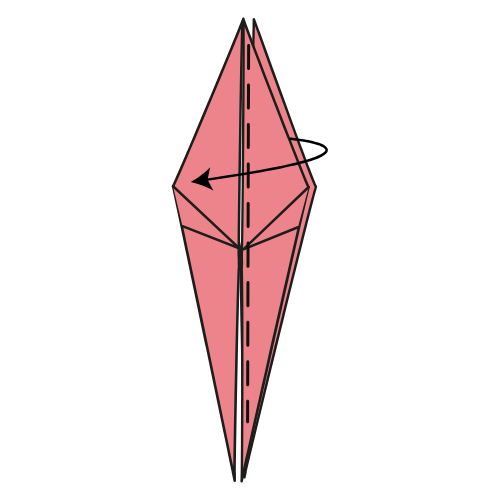
Stap17
Verplaats de andere flap naar links
Vouw de rechterbovenflap naar links, net als in stap 15.
Je moet zienBeide losse binnenpunten verborgen tussen de buitenste lagen.
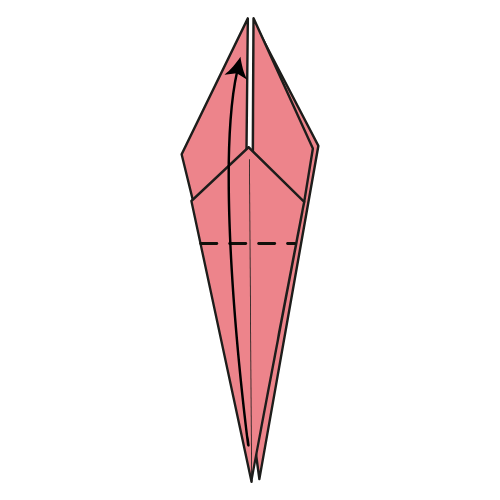
Stap18
Til het eerste binnenste punt op
Vouw de onderste hoek van de bovenste flap omhoog langs de bestaande horizontale vouw.
Je moet zienEen lang binnenpunt tussen de buitenste lagen.
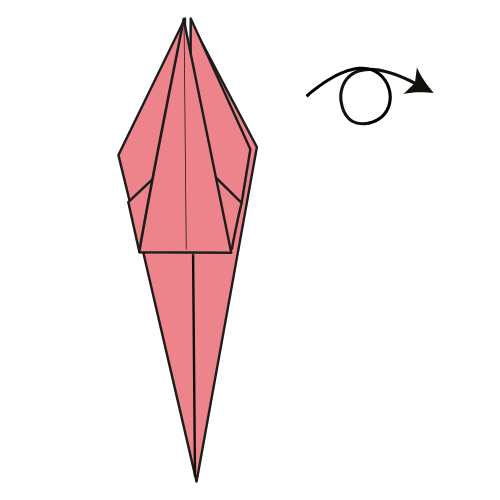
Stap19
Draai het model om
Draai het model naar de andere kant.
Je moet zienHet tweede binnenste punt klaar om te worden verhoogd.
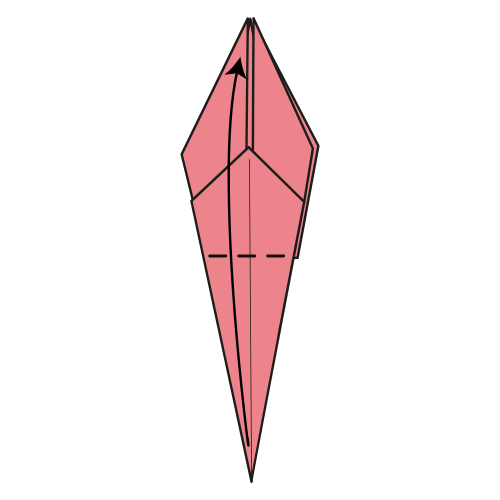
Stap20
Til het tweede binnenpunt op
Herhaal dezelfde opwaartse vouw als in stap 18.
Je moet zienTwee lange binnenste punten verhoogd tot dezelfde hoogte.
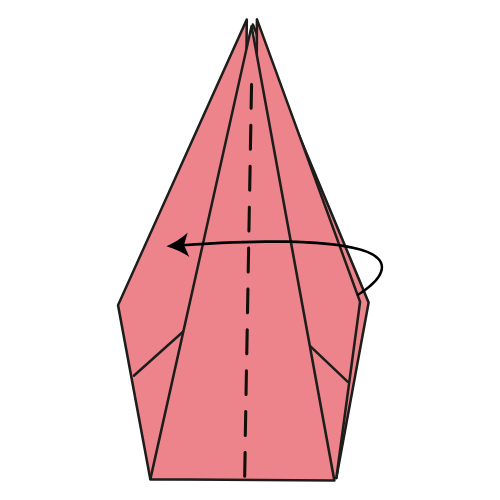
Stap21
De rechterflap sluiten
Vouw de rechterbovenflap naar links.
Je moet zienEen verhoogd punt netjes tussen de zijlagen.
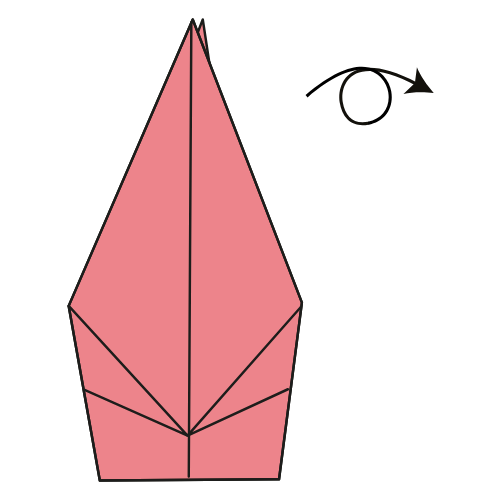
Stap22
Draai het model om
Draai het model naar de andere kant.
Je moet zienDe resterende open kant tegenover je.
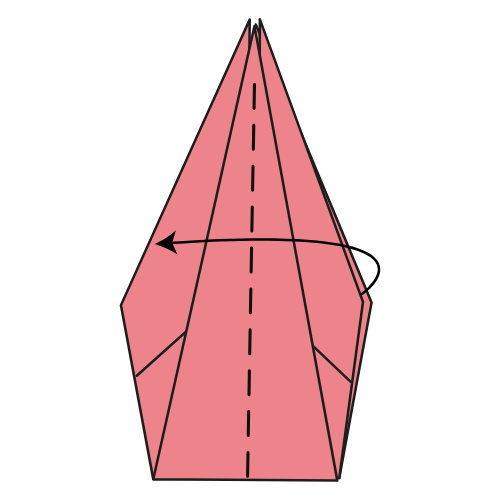
Stap23
Sluit de andere flap
Vouw de rechterbovenflap weer naar links.
Je moet zienEen breed lichaam met twee smalle punten tussen de vleugels.
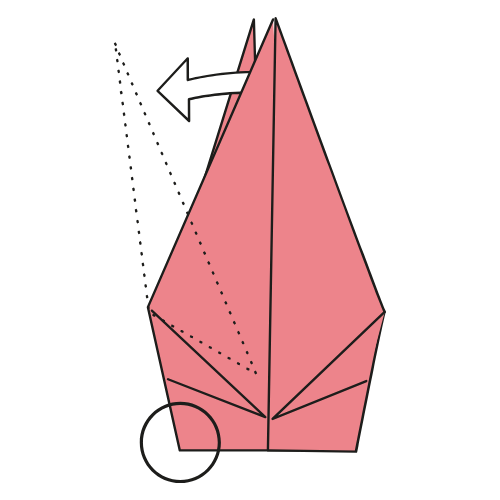
Stap24
Vouw de staart naar links
Houd de staart tussen de vleugels, draai hem naar links, richt hem uit met de buitenrand en vlak de vouw.
Je moet zienDe staart schuin naar links van het lichaam.
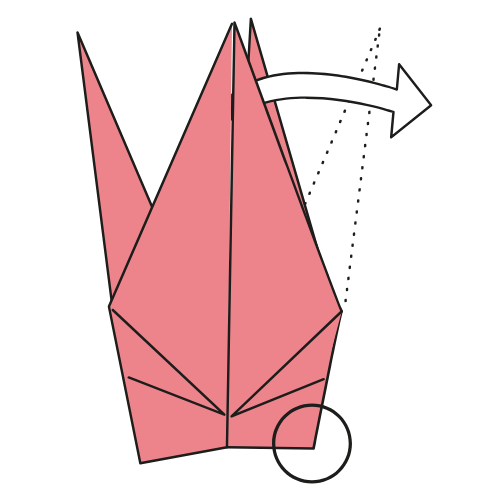
Zoomen na beide draaivouwen. 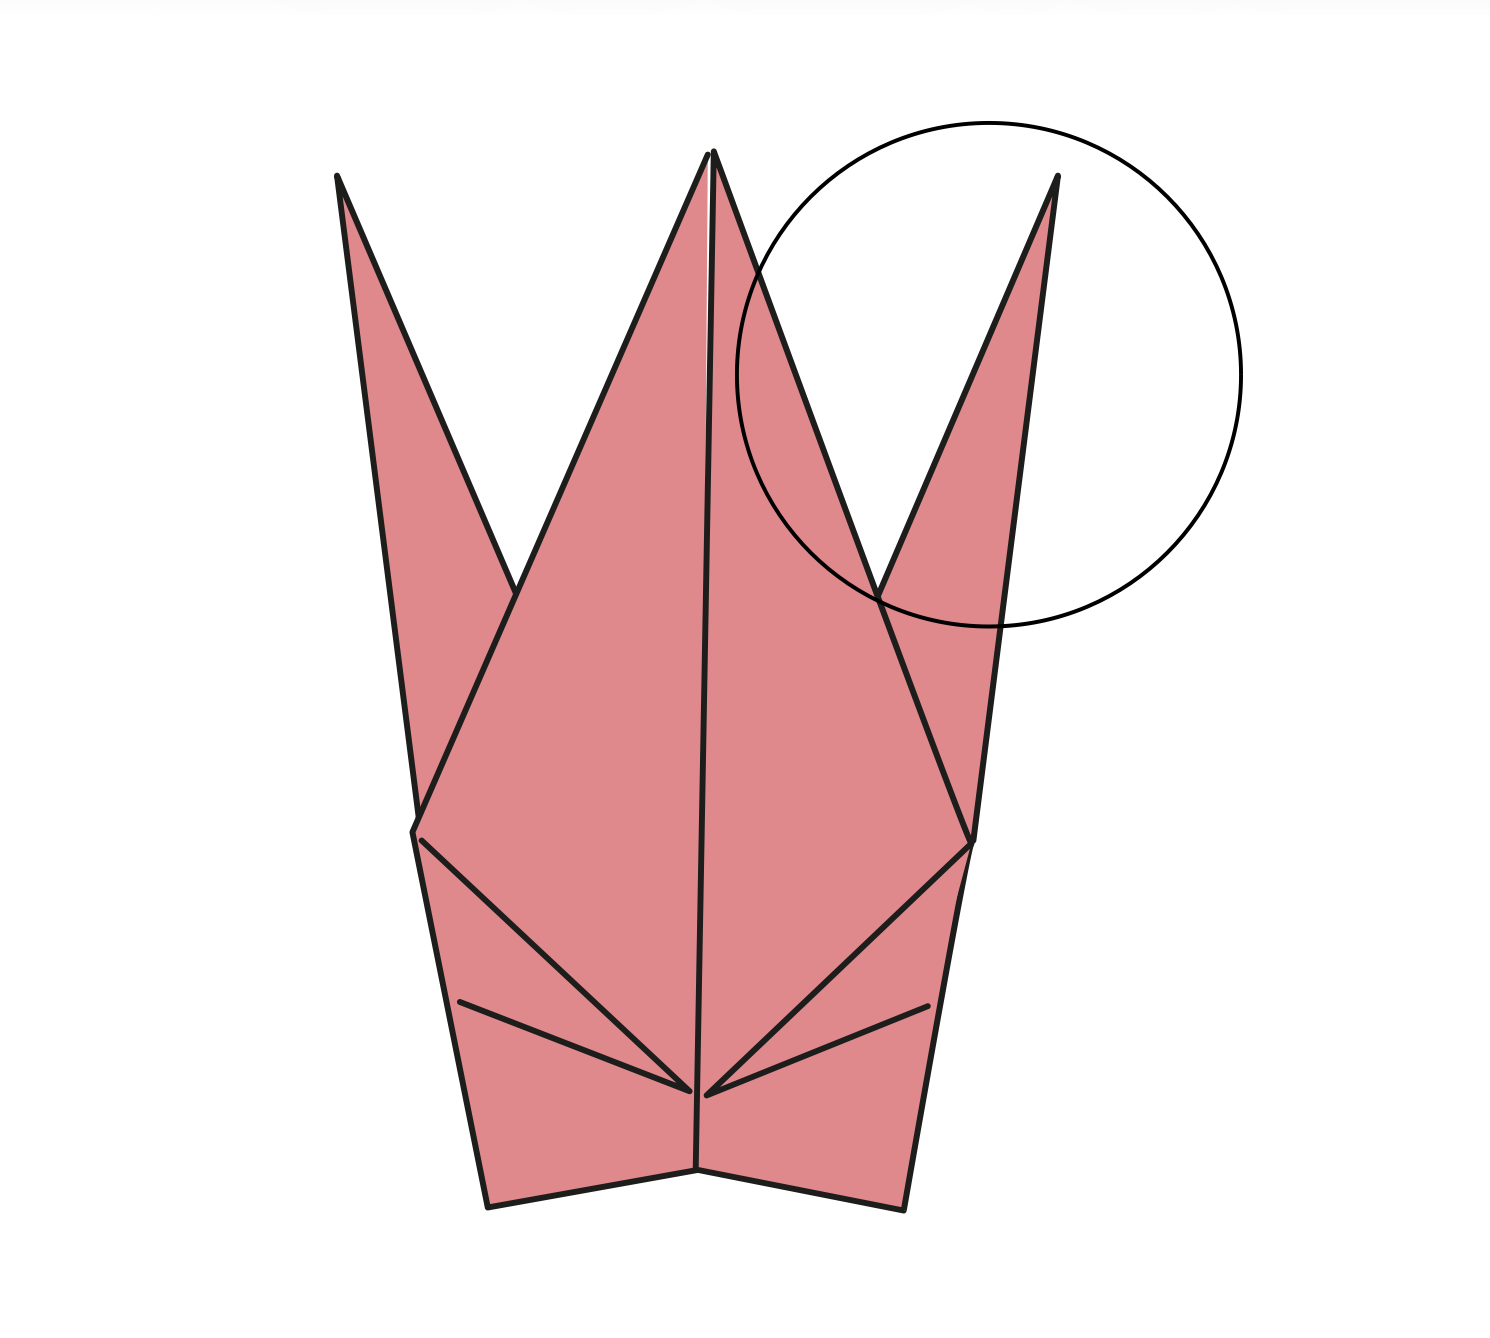
Stap25
Vouw de hals naar rechts
Herhaal dezelfde draaivouw aan de rechterkant.
Je moet zienDe hals en staart spreidden zich uit naar tegenover elkaar liggende kanten onder de vleugels.
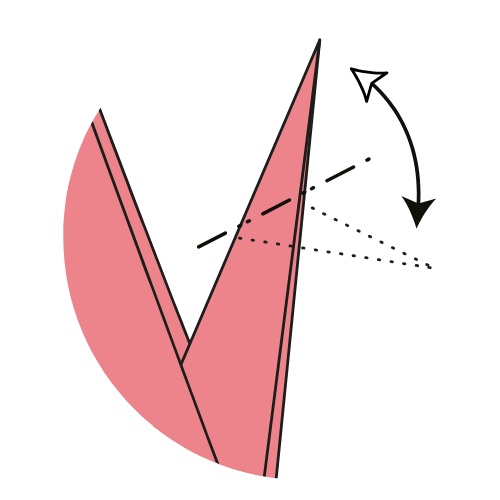
Stap26
Crease het hoofd
Vouw de punt van de hals naar rechts, vouw stevig, dan ontvouw het.
Je moet zienEen geleide vouw waar het hoofd zal buigen; de exacte positie kan variëren.
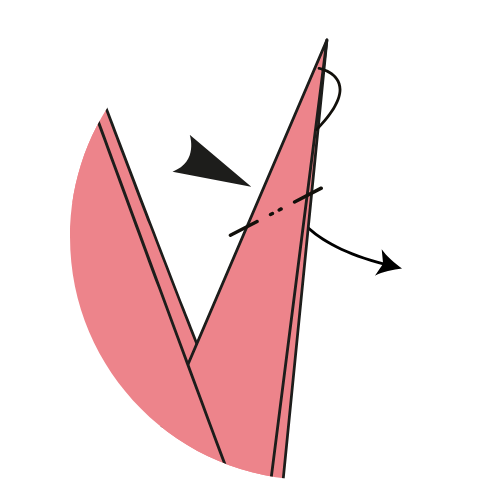
Het hoofd moet er zo uitzien. 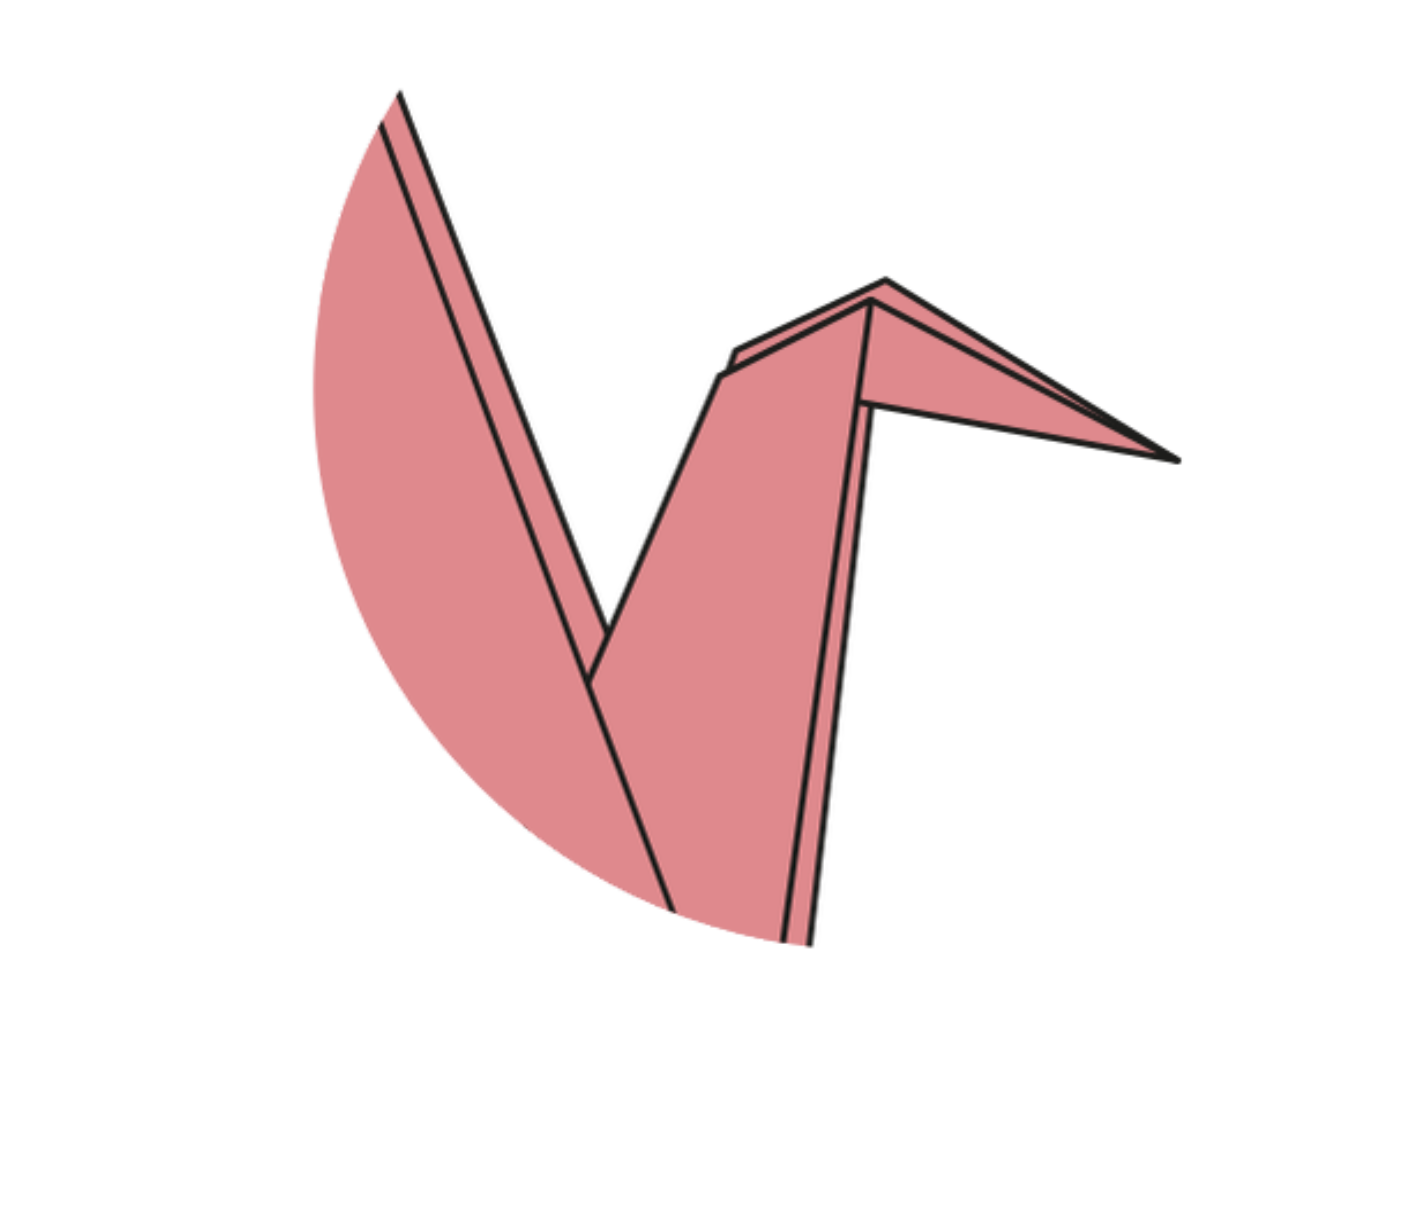
Stap27
Binnenste keer het hoofd
Open de hals lichtjes en duw de punt naar binnen langs de vouwen vanaf stap 26.
Je moet zienEen klein puntig hoofd gebogen vanuit de nek.
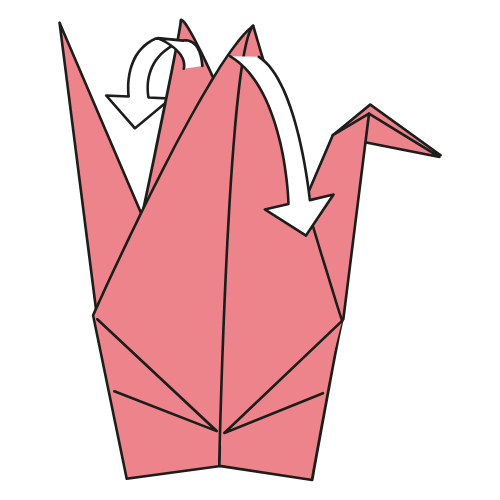
Stap28
Open de vleugels
Trek de twee vleugels voorzichtig uit elkaar en vorm het lichaam zonder het plat te maken.
Je moet zienEen voltooide kraan met open vleugels, een rechtopstaande hals en een spitse staart.
Gebruik de pijltjestoetsen om tussen stappen te bewegen
Stap1van28: Crease beide diagonalen
Je kraan is klaar!
Open de vleugels zachtjes en slijp de kop, hals en staartplooien zonder het lichaam plat te maken.
Traditioneel ontwerp, door Nick Robinson getekend en uitgegeven doorOrigami.me.
- Als het lichaam niet open gaat
- de vleugels uit elkaar houden en het centrum van onderen ondersteunen.
- Als de nek begint te scheuren
- open de lagen een beetje voordat u de tegenvouw naar binnen maakt.
- Als de vleugels er ongelijk uitzien
- terug naar stap 28 en open beide zijden met hetzelfde bedrag.