Kreativiti dalam setiap lipatan
Kura-kura Origami
Lipat satu lembar persegi ke kura-kura dengan empat kaki, kepala dan cangkang bulat dalam sembilan belas langkah, membentuk cangkang bebas di ujung.
- Mudah
- 19 langkah
- 15 menit
- 1 lembar persegi
Kertas Ukiran: Satu x 6 × 6 in (15 × 15 cm) persegiKamiKertas origami.
Ditulis dan ditinjau ulang olehInThink Guide team
Tinjauan harian:14 September 2026
Rujukan referensi dikonsultasikan: Origami.me
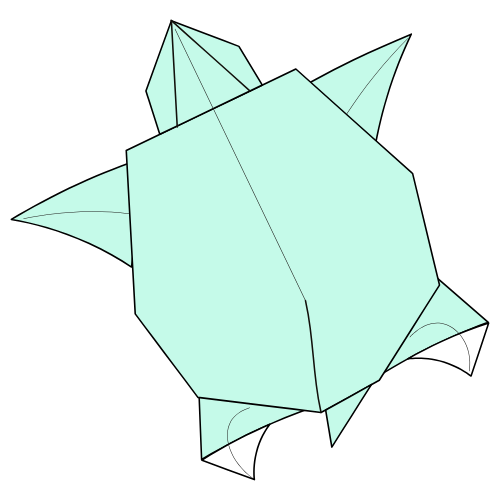
Penyumu sudah siap!
ANA 19
Langkah - langkah dari segi empat sampai penyu
1
Kilauan garis tengah yang membimbing setiap lipatan
m 15cm
alun-alunKamiKertas
WANITA 0
Potongan, lem atau pita perlu
Sebelum Anda melipat
Diagram-diagram tersebut menggunakan panah dan tanda lipat untuk menunjukkan arah setiap gerakan.
Garis putus-putus
Lipat di sini. Garis menghilang di dalam model sekali lipat.
Panah melengkung
Ini menunjukkan arah perjalanan kertas.
Anak panah
Lipat atau tekan lapisan yang ditunjukkan ke arah ini.
Shading
Bagian yang teduh adalah lapisan saat ini menghadap Anda.
Langkah 7 sampai 14 dicerminkan di kedua sisi, jadi lipat satu sisi, periksa, lalu salin. Kerang pada langkah 17 tidak memiliki titik referensi — melipat kedua sisi secara simetris dengan mata.
Lipat kura-kuramu
Melangkah1Dari19
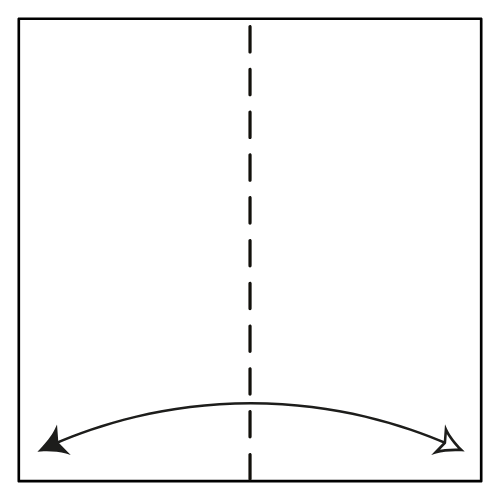
Melangkah01
Crease garis tengah
Mulai dengan sisi putih kertas menghadap ke atas. Lipat kertas dalam setengah vertikal, kemudian terungkap untuk membuat garis tengah.
Kau harus lihatSebuah persegi datar dengan lipatan vertikal tunggal di tengah.
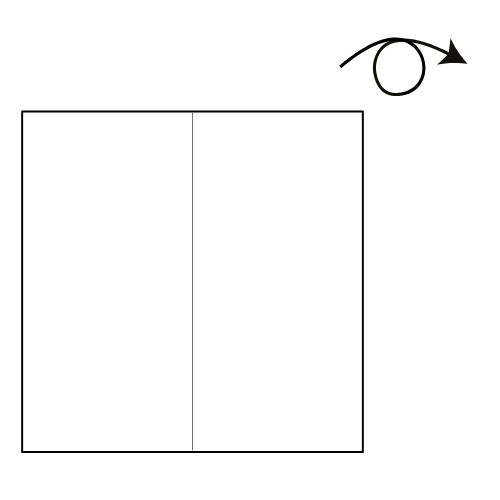
Melangkah02
Balikkan kertasnya
Berikan kertasnya.
Kau harus lihatAlun-alun yang sama dengan sisi berwarna menghadap Anda dan garis tengah masih terlihat.
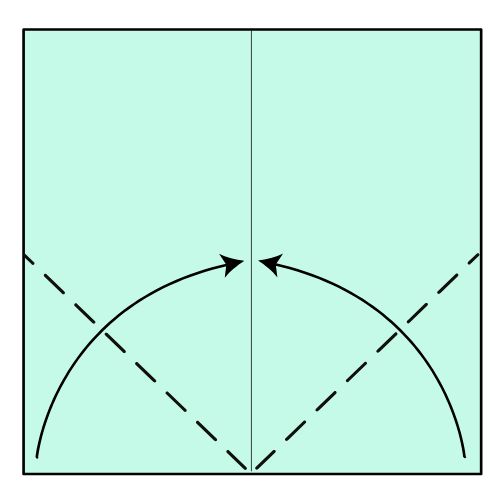
Melangkah03
Lipat sudut bawah di
Lipat kiri dan kanan bawah sudut ke tengah.
Kau harus lihatSebuah persegi berwarna dengan bawah runcing, seperti rumah terbalik.
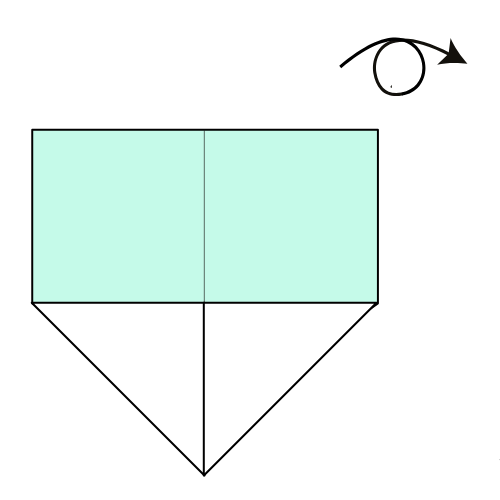
Melangkah04
Balikkan kertasnya
Berikan kertasnya.
Kau harus lihatSebuah band berwarna melintasi atas, persegi putih di bawahnya dan titik di bawah.
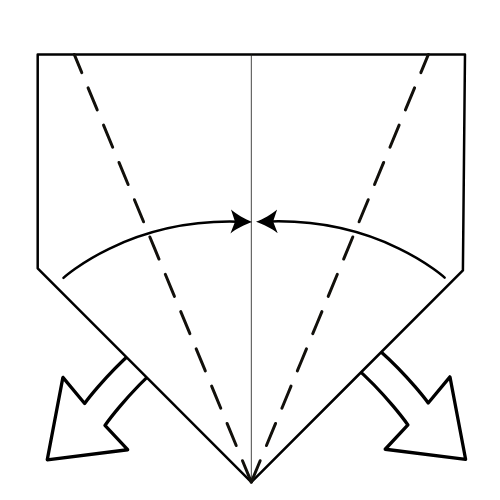
Melangkah05
Lipat tepi bawah ke atas
Pada setiap sisi, lipat tepi bawah ke garis tengah, hanya melalui lapisan atas. Lapisan bawah akan bergerak ke depan.
Kau harus lihatDua lipatan sempit bertemu di garis tengah, dengan lapisan di bawah mengayun ke depan.
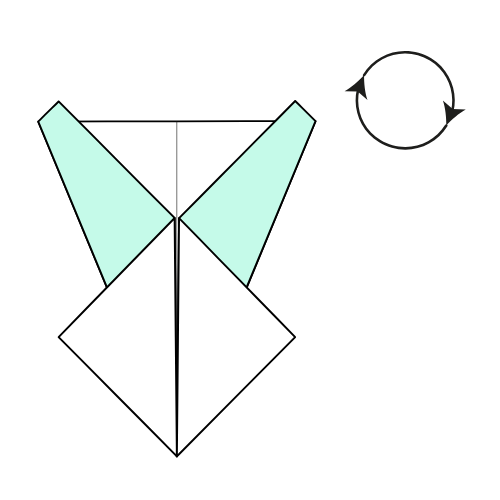
Melangkah06
Memutar kertas 180°
Putar kertas 180°.
Kau harus lihatBentuk yang sama terbalik, dengan bagian lebar sekarang di bagian atas.
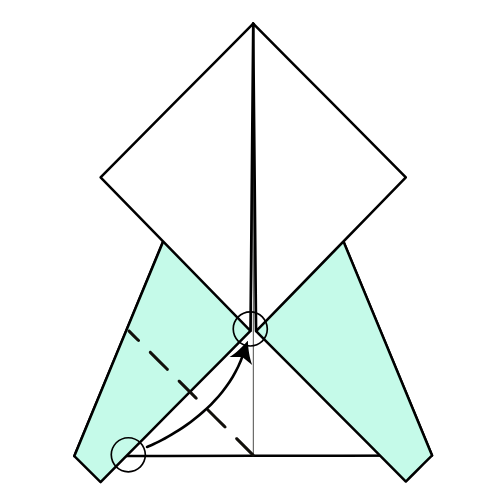
Melangkah07
Lipat sudut kiri bawah di
Lipat sudut kiri bawah ke tengah. Pastikan titik lingkaran bertemu.
Kau harus lihatA langsing segitiga di kiri, dengan dua titik ditandai duduk tepat di atas satu sama lain.
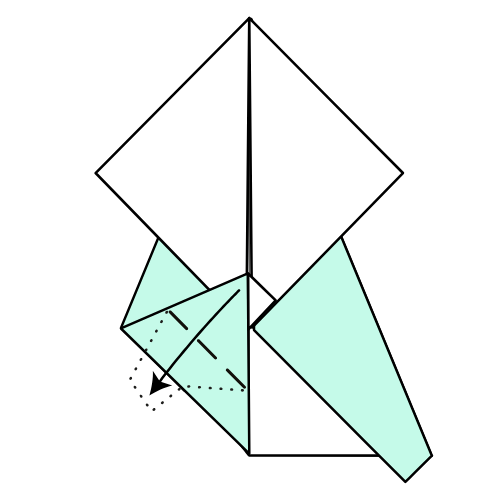
Melangkah08
Lipat lipatan atas ke bawah
Lipat bagian atas kepakan di sepanjang garis putus-putus.
Kau harus lihatSisi kiri selesai sebagai kaki runcing dengan flap berbaring datar.
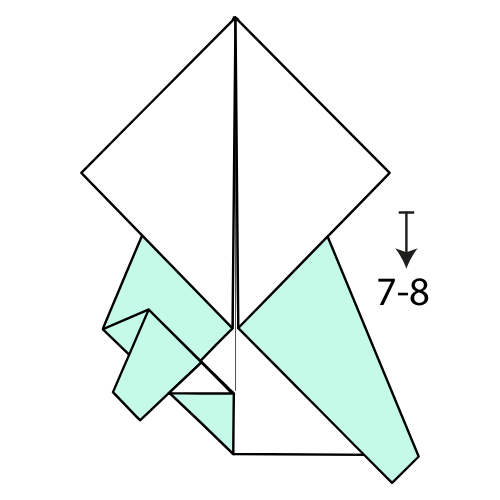
Melangkah09
Di sebelah kanan
Pengulangan langkah 7 dan 8 di sisi kanan.
Kau harus lihatDua kaki yang cocok di bagian bawah, bercermin melintasi garis tengah.
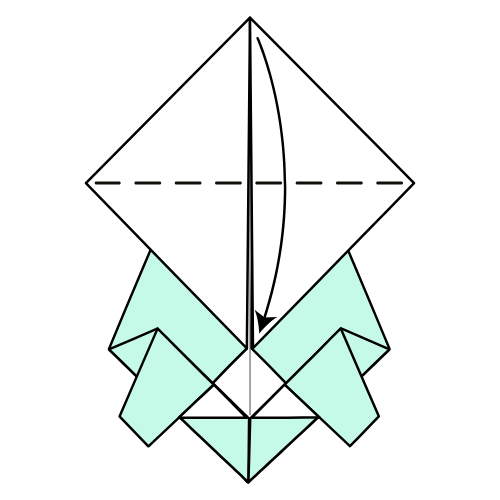
Melangkah10
Lipat persegi putih menjadi dua
Lipat area persegi putih dalam setengah dari atas ke bawah sepanjang pepenjuru horisontal.
Kau harus lihatKawasan putih diblokir, membawa titik atas turun ke tengah model.
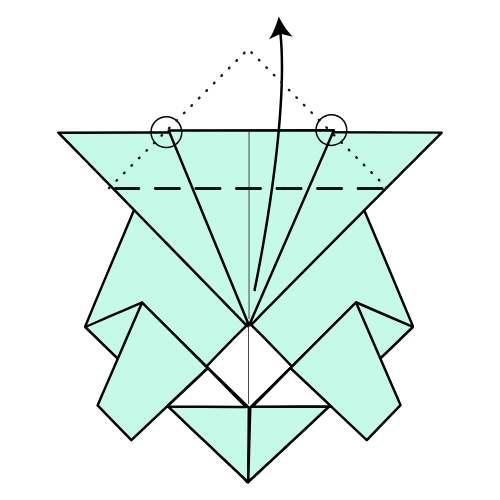
Melangkah11
Lipat flap kembali ke atas
Lipat lipatan yang kau lipat. Gunakan titik lingkaran sebagai panduan. Flap atas harus memenuhi dua titik di mana lapisan bawah bertemu.
Kau harus lihatSebuah kepakan segitiga berdiri di atas tubuh, tepinya mendarat di dua titik yang ditandai.
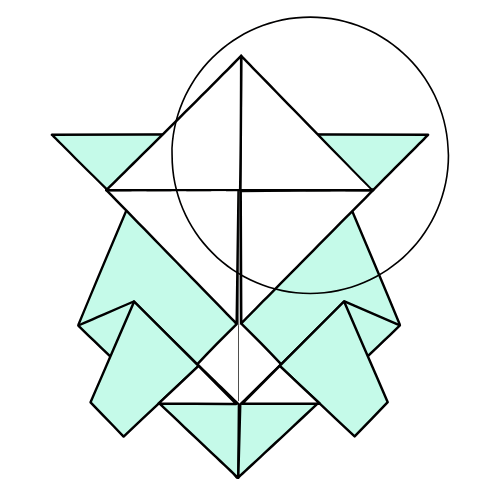
Pemandangan ini menemukan jarak dekat di sudut kanan bawah dari seluruh model. 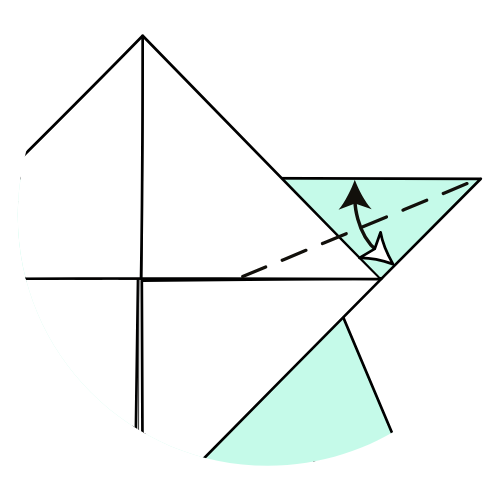
Melangkah12
Kiaskan tepi kanan bawah
Lipat tepi kanan bawah untuk memenuhi tepi atas. Krease baik, kemudian terungkap.
Kau harus lihatSebuah lipatan pepenjuru di sudut kanan, dengan kertas datar lagi.
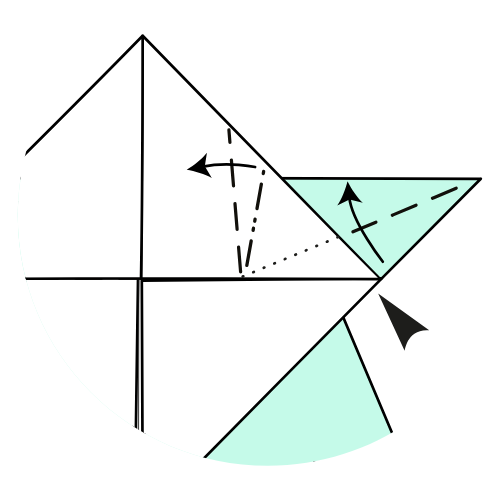
Melangkah13
fold
Buat lipatan seperti yang terlihat. Angkat lapisan atas, lipat sepanjang lipatan dari langkah 12, laras lapisan, lalu ratakan.
Kau harus lihatPojok kanannya berputar ke dalam, dengan lapisan tergeletak rata di sekitar lipatan baru.
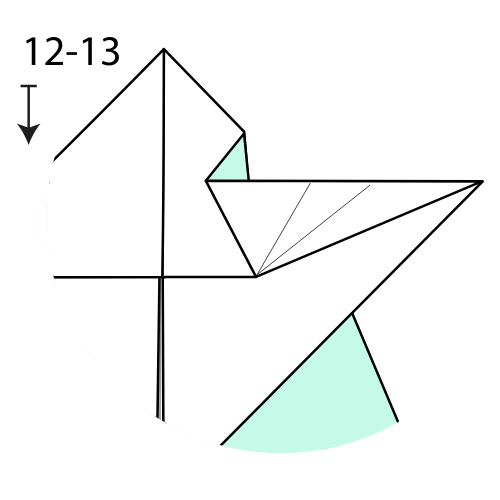
Melangkah14
Di sebelah kiri
Mengulangi langkah 12 dan 13 di sisi kiri.
Kau harus lihatKedua-dua sudut berliku simetris, menyempit bagian atas model.
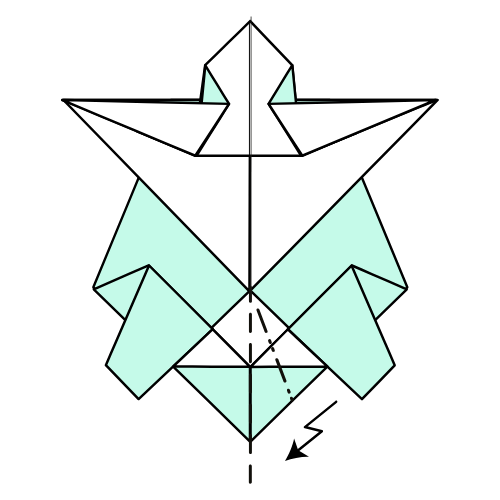
Melangkah15
Lipat ekornya
GOWOWO Pleat melipat sudut bawah untuk membentuk ekor penyu.
Kau harus lihatSebuah ekor pendek terlipat bolak-balik di titik bawah.
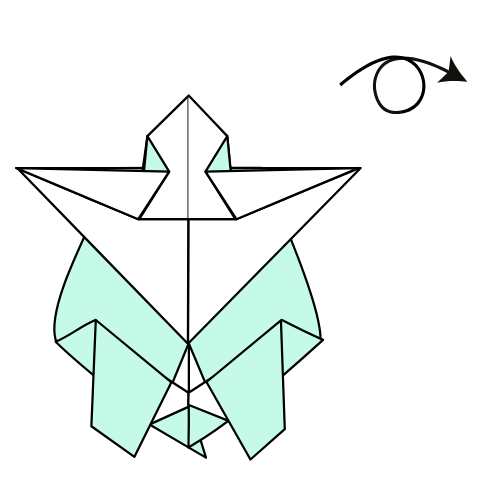
Melangkah16
\"Membalikkan model atas\"
Buat modelnya terbalik.
Kau harus lihatKura-kura dari atas: cangkang lebar, empat kaki dan kepala kecil.
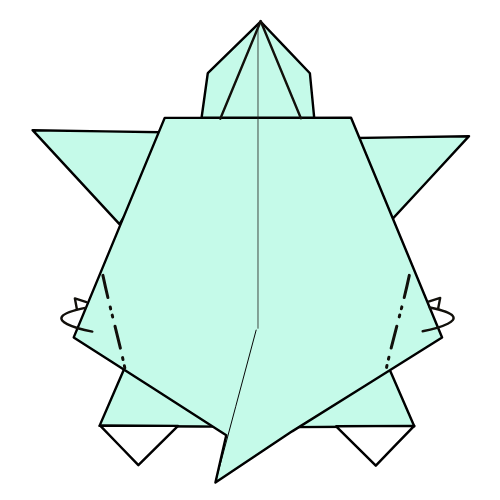
Melangkah17
Kumpul bulat shell
Gunung gondok lipat cangkang kiri dan kanan sudut untuk bundarkan cangkang. Tak ada titik referensi yang tepat, jadi atur sudut sesuai dengan keinginanmu. Sikukan kedua sisi secara simetris.
Kau harus lihatCangkang dengan sudut yang dilembutkan, bukannya titik tajam, bahkan di kedua sisi.
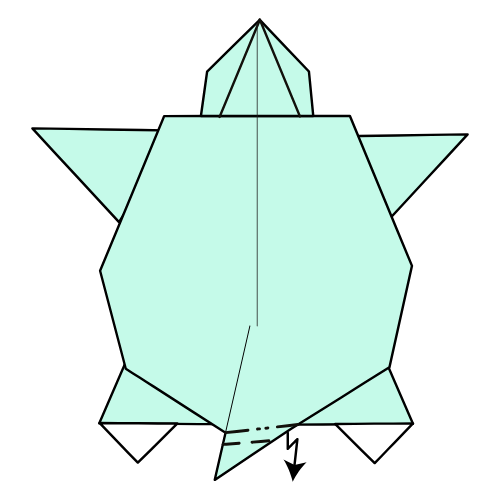
Melangkah18
Pendekkan ekor
Lilitkan ekornya dan kunci lapisan bawahnya.
Kau harus lihatA ekor pendek dan tepi belakang yang tetap tertutup ketika Anda menangani model.
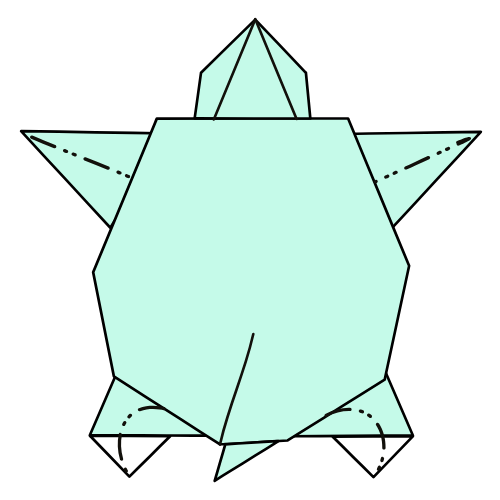
Melangkah19
Keris kaki
Kecilkan kaki untuk menambah bentuk dan volume.
Kau harus lihat4 kaki lendir di sekeliling cangkang bundar — kura - kuramu yang sudah habis.
Takah menggunakan tombol panah untuk bergerak di antara langkah
Melangkah1Dari19: Crease garis tengah
Penyumu sudah siap!
Lengkungkan cangkang di atas telapak tangan Anda sehingga terus kubah, kemudian menyebar keempat kaki sampai kura-kura berdiri tingkat.
Desain Tradisional, didiagram oleh Nick Robinson dan diterbitkan olehOrigami.me.
- Jika kura-kura tidak akan berdiri
- Ratakan sisi bawah terhadap meja dan menyebar empat kaki keluar merata.
- Jika air mata lapisan selama lipatan lumpur
- Angkat lapisan atas langkah 13 lebih lambat dan biarkan lapisan bawah bergerak dengannya daripada memaksa lipatan.
- Jika shell tidak akan tinggal bulat
- Membuat langkah 17 lipatan gunung lebih tajam, dan cocok dengan sudut di sisi kiri dan kanan.