Kreativiti dalam setiap lipatan
Katak lompat Origami
Tukar satu lembar persegi menjadi katak yang muncul saat kau menekan punggungnya.
- Mudah
- 22 langkah
- 15 menit
- 1 lembar persegi
Paper: Satu x 6 × 6 in (15 × 15 cm) persegiKamiKertas origami.
Ditulis dan ditinjau ulang olehInThink Guide team
Tinjauan harian:14 September 2026
Rujukan referensi dikonsultasikan: Origami.me
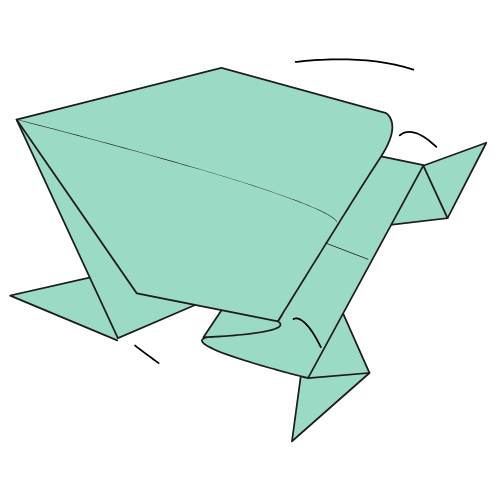
Kodok lompatmu sudah siap!
22
Langkah - langkah dari segi empat sampai katak
6
Starter lipatan yang membentuk kaki
15cm
alun-alunKamiKertas buatanmu bekerja dengan sempurna
0
Potongan, lem atau pita perlu
Sebelum Anda melipat
Setiap diagram menggunakan tanda yang sama. Pelajari mereka sekali dan seluruh halaman membaca sendiri.
Garis putus-putus
Lipat di sini. Garis menghilang di dalam model sekali lipat.
Panah melengkung
Ke arah mana kertas berjalan. Panah berputar berarti putar modelnya.
Anak panah
Angkat, buka atau putar kepakan pada arah anak panah.
Warna dan putih
Warna adalah bagian depan lembaran, putih adalah bagian belakang.
Eksekusi setiap lipatan dengan tegas, terutama lipatan yang membuat kaki depan dan belakang terurai.
Lipat katak lompatmu
Melangkah1Dari22
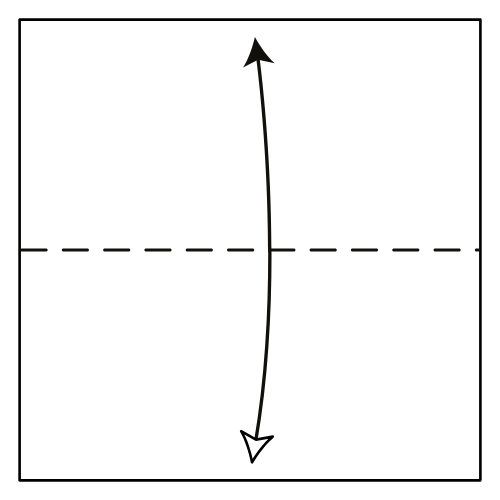
Melangkah01
Lipat dua
Mulai dengan sisi putih menghadap ke atas. Lipat kertas dalam setengah horizontal, kemudian terungkap.
Kau harus lihatSebuah persegi dengan satu lipatan tengah horizontal.
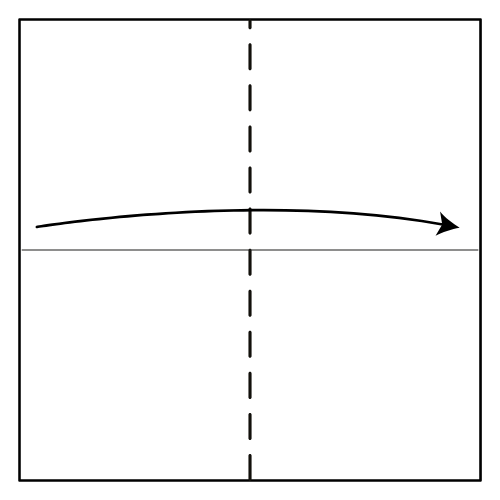
Melangkah02
Lipat secara vertikal
Lipat kertas dalam setengah vertikal dari kiri ke kanan, kemudian buka.
Kau harus lihatSebuah alun-alun dengan lipatan tengah horizontal dan vertikal.
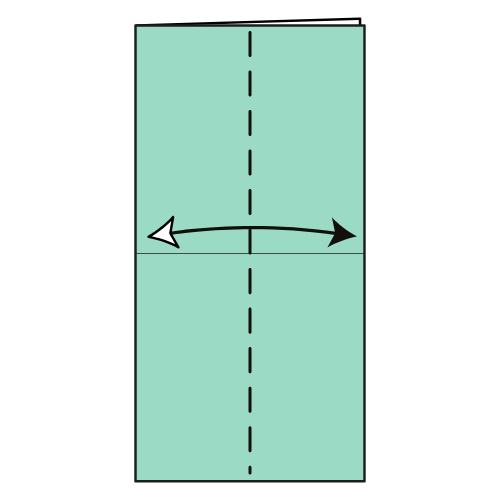
Melangkah03
Lipat setengah lagi
Lipat kertasnya setengah mendatar lagi, kemudian buka.
Kau harus lihatPusat lipatan diperkuat dan terlihat jelas.
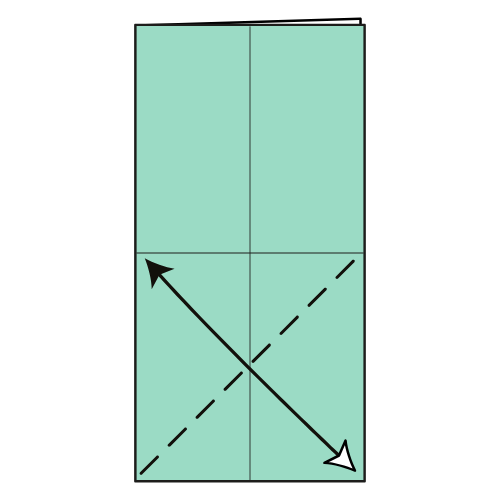
Melangkah04
Di sudut kanan
Lipat tepi kanan bawah ke garis tengah horisontal. Krease baik, kemudian terungkap.
Kau harus lihatPanduan pepenjuru mengalir dari daerah kanan bawah.
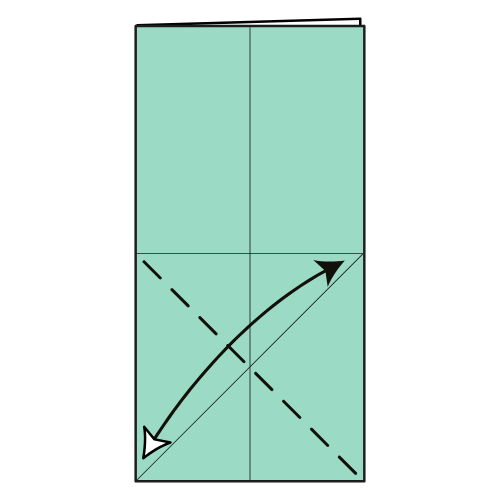
Melangkah05
Di sudut kiri
Lipat tepi bawah-kiri ke garis tengah horisontal. Krease baik, kemudian terungkap.
Kau harus lihatPembimbing pepenjuru berpadanan pada kedua sisi bawah.
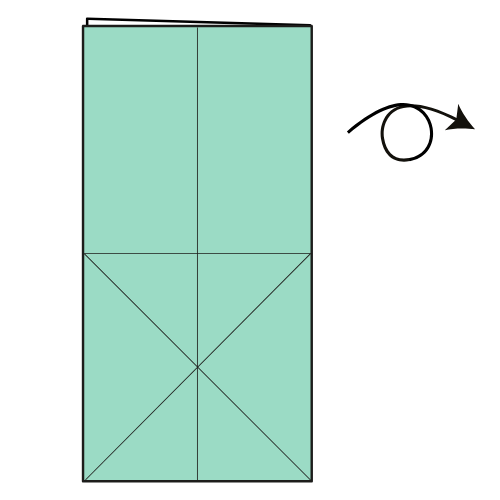
Melangkah06
Balikkan kertasnya
Jadi, sisi lain menghadapmu.
Kau harus lihatBentuk persegi panjang yang sama dengan lipatan panduan bawah menunjukkan.
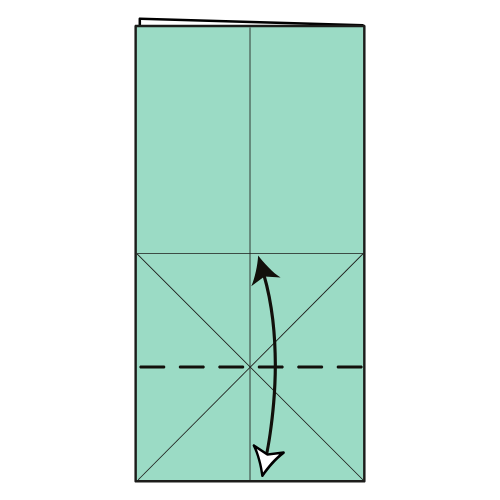
Melangkah07
Kerang tepi bawah
Lipat tepi bawah ke garis tengah horisontal. Krease baik, kemudian terungkap.
Kau harus lihatSebuah panduan mendatar baru lipatan di bagian bawah.
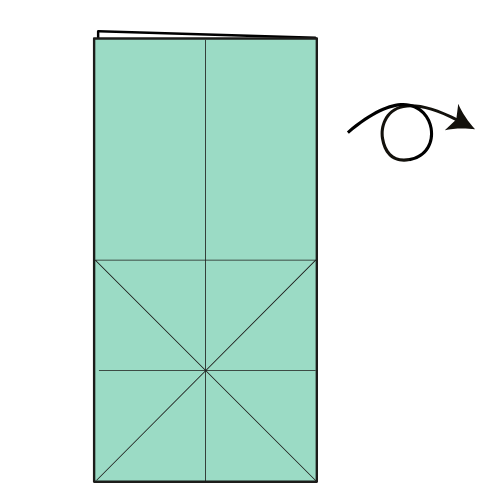
Melangkah08
Balikkan kertasnya
Hidupkan lagi kertasnya.
Kau harus lihatSisi berwarna menghadapmu, siap runtuhkan bagian bawah.
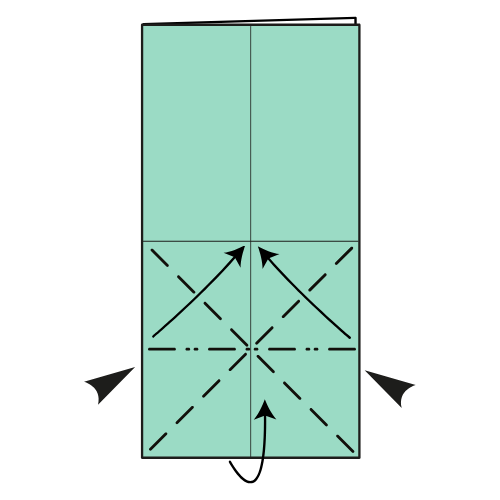
Melangkah09
Kuncupkan bagian bawah
Push side kiri dan kanan bawah ke dalam sementara melipat tepi bawah ke atas untuk memenuhi garis tengah horisontal.
Kau harus lihatBagian bawah berlapis dengan dua lipatan segitiga.
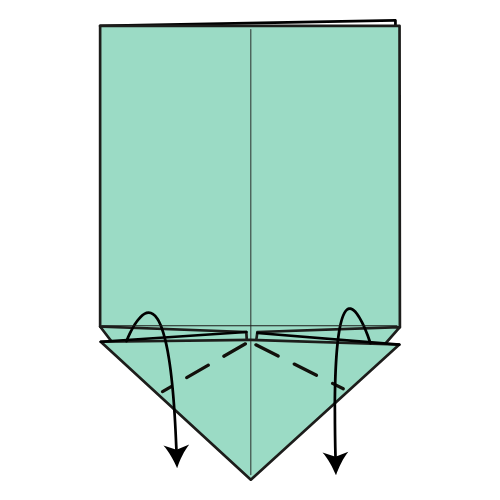
Melangkah10
Lipat lipatan atas ke bawah
Lipat bagian atas kepakan ke bawah. Jadi buat kaki depan katak simetris.
Kau harus lihatDua kaki depan yang cocok di bawah bagian atas.
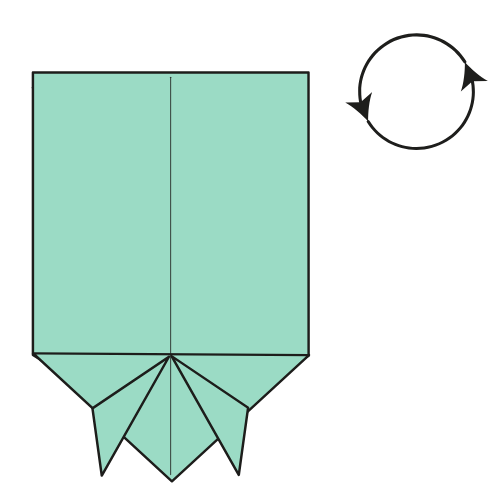
Melangkah11
Putar modelnya
Putar model 180 derajat.
Kau harus lihatKaki depan di bagian atas dan tubuh lebar di bawah.
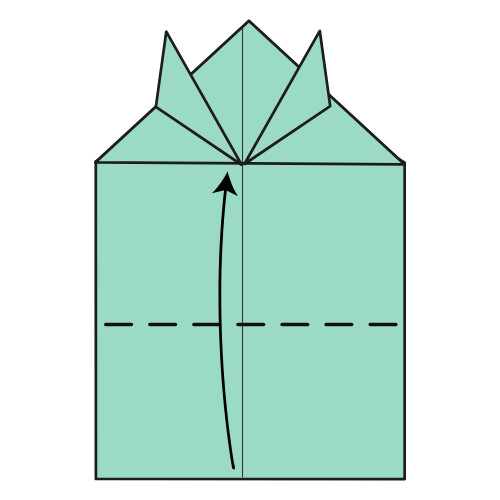
Melangkah12
Lipat tepi bawah ke atas
Lipat tepi bawah sampai ke garis horisontal terdekat.
Kau harus lihatFODE persegi panjang bawah yang disingkat dengan lipatan melintang.
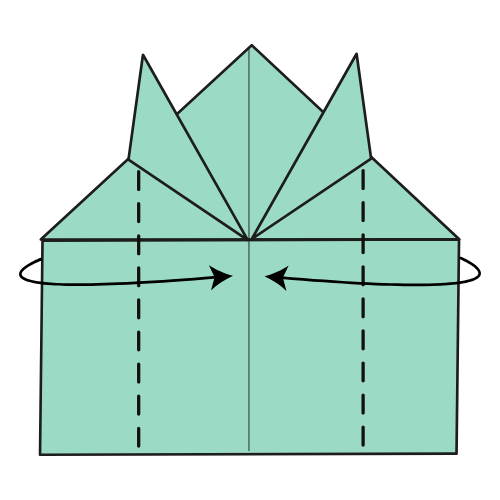
Melangkah13
Lipat sisi ke dalam
Lipat tepi kiri dan kanan ke garis tengah vertikal.
Kau harus lihatBagian tengah yang sempit di bawah kaki depan.
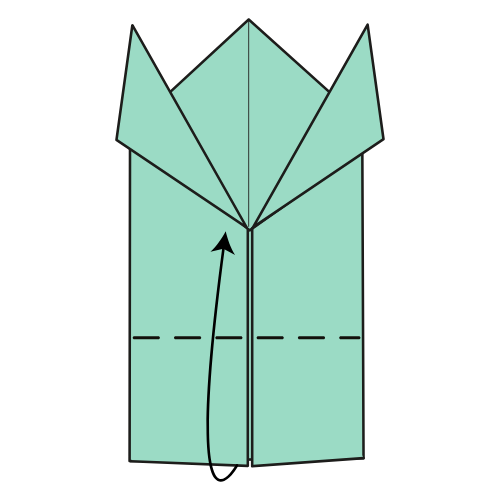
Melangkah14
Bawa tepi bawah ke atas
Lipat tepi bawah sampai memenuhi titik di mana kaki depan terhubung.
Kau harus lihatSebuah tubuh kompak dengan kaki depan pertemuan di bagian atasnya.
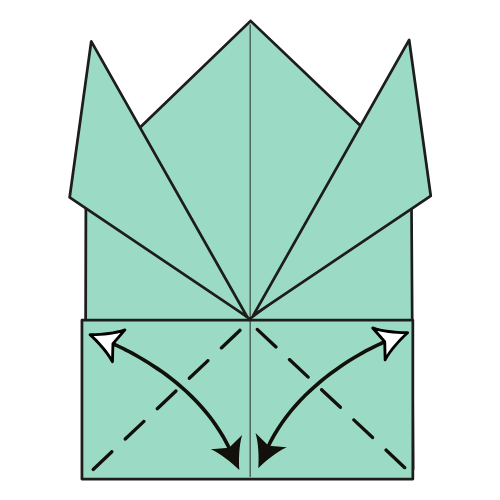
Melangkah15
Buatlah lipatan panduan
Lipat tepi kiri dan kanan dari atas kepakan ke bawah ke tepi bawah, kemudian membuka mereka.
Kau harus lihatDua panduan pepenjuru lipatan pada lipatan atas.
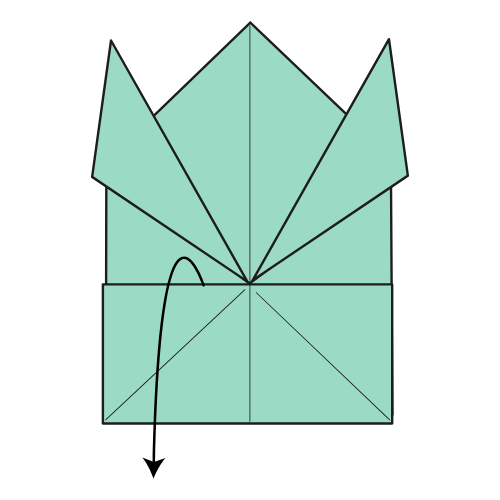
Melangkah16
Buka penutup lipatan atas
Tutup penutup atas dari langkah 14.
Kau harus lihatKepakan atas terbuka, dengan kepakan panduan baru terlihat.
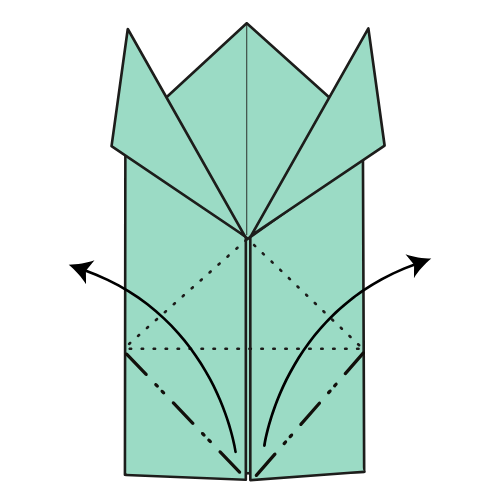
Melangkah17
Buka kaki belakang
Angkat lipatan bawah dan dorong tepi bawah ke atas untuk memenuhi titik di mana kaki depan terhubung. Kepak bawah bergerak ke luar di setiap sisi.
Kau harus lihatDua sayap lebar memanjang ke luar untuk menjadi kaki belakang.
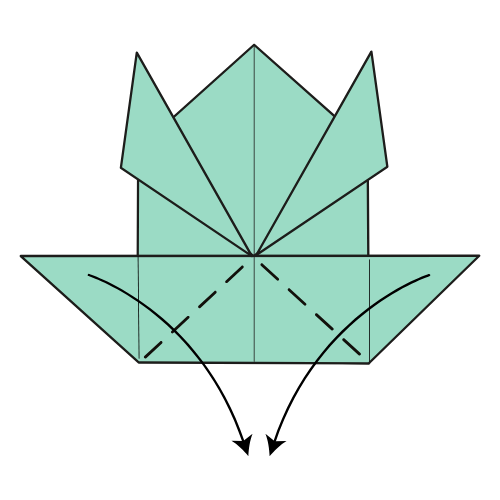
Melangkah18
Lipat sisi mengepak ke bawah
Lipat lipatan kiri dan kanan sepanjang lipatan yang ada.
Kau harus lihatKepakan sayap belakang lebar bersudut ke bawah di kedua sisi.
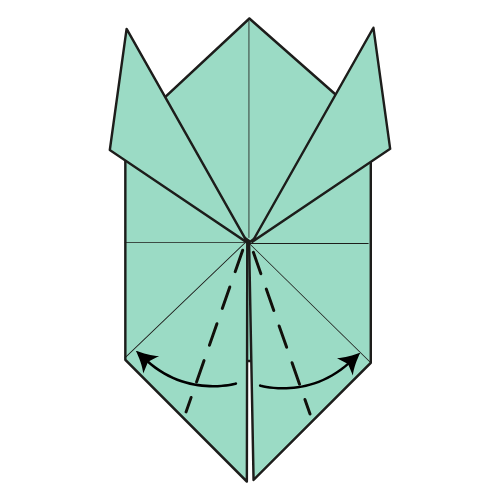
Melangkah19
Bentuk kaki belakang
Lipat tepi dalam kepakan bawah ke garis lipatan terdekat untuk membentuk kaki belakang katak.
Kau harus lihatDua kaki belakang menunjuk, sejajar simetris.
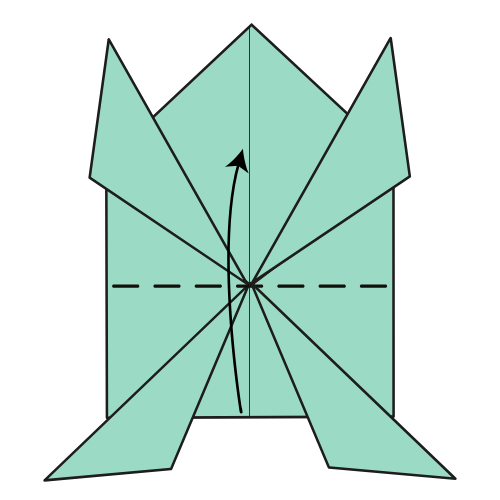
Melangkah20
Lipat bagian bawah
Lipat bagian bawah di sepanjang garis di mana kaki depan dan belakang bertemu.
Kau harus lihatBentuk katak dengan empat kaki berkumpul mengelilingi tubuh.
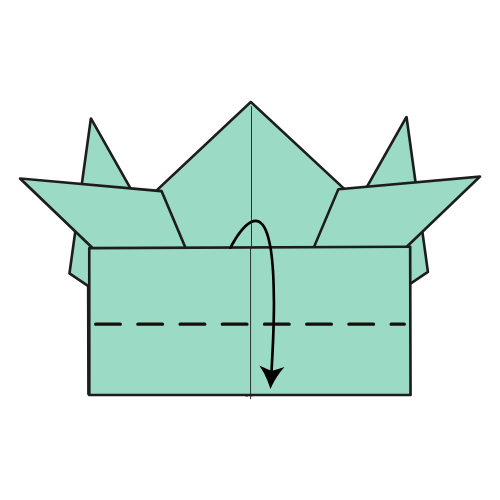
Melangkah21
Crease musim semi
Lipat lipatan atas setengah dari atas ke bawah. Crease baik.
Kau harus lihatSebuah lipatan melintang yang memberikan katak musim seminya.
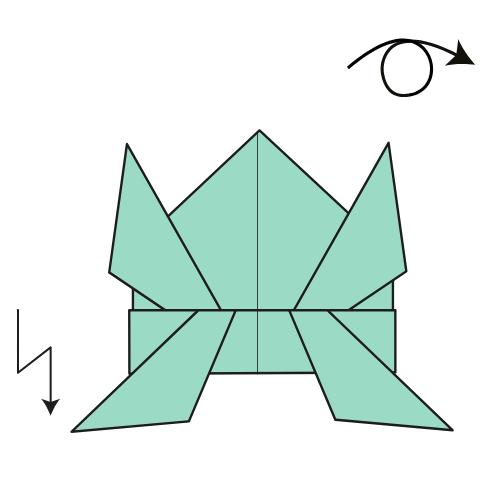
Melangkah22
Berbalik dan meregangkan kaki
Buat modelnya terbalik dan perlahan meregangkan kaki belakangnya.
Kau harus lihatSebuah katak selesai dengan kaki belakangnya siap untuk mendorong off.
Takah menggunakan tombol panah untuk bergerak di antara langkah
Melangkah1Dari22: Lipat dua
Kodok lompatmu sudah siap!
Masukkan katak itu ke permukaan rata, lalu tekan bagian belakang dengan lembut untuk melompat.
Desain Tradisional, didiagram oleh Nick Robinson dan diterbitkan olehOrigami.me.
- Jika katak tidak akan duduk datar
- ¡¡Revisit langkah 20 dan menyelaraskan kaki depan dan belakang sebelum berderit.
- Jika lapisan menolak pembukaan
- Kepakkan kepakan kepakan kepakan dan bukan menariknya dengan tajam.
- Jika tidak melompat
- Regangkan kaki belakang ke luar lagi setelah langkah 22.