One square of paper, twenty-two steps, no glue.

접을 때마다 피어나는 창의력

Origami jumping frog

Turn one square sheet into a frog that springs when you press its back.

  • 쉬움
  • 22단계
  • About 15 minutes
  • 1 square sheet

Paper: One 6 × 6 in (15 × 15 cm) square of Kami origami paper.

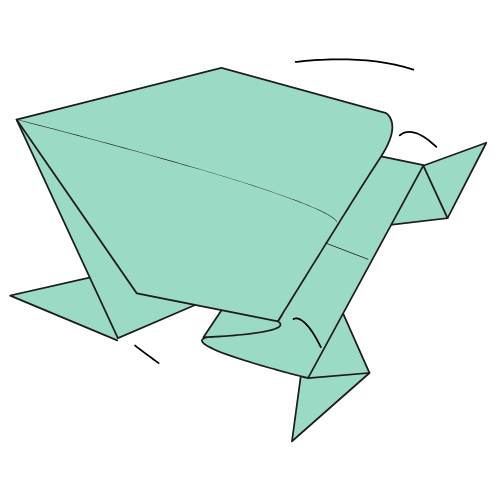
Your jumping frog is ready!

22

numbered steps from square to frog

6

starter creases that shape the legs

15cm

square Kami paper works perfectly

0

cuts, glue or tape needed

Before you fold

Every diagram uses the same marks. Learn them once and the rest of the page reads itself.

  • Dashed line

    Fold along here. The line disappears inside the model once folded.

  • Curved arrow

    Which way the paper travels. A looped arrow means turn the model over.

  • Solid arrows

    Lift, open or swivel the indicated flap in the arrow's direction.

  • Colour and white

    Colour is the front of the sheet, white is the back.

Press every crease firmly, especially the folds that make the front and back legs spring apart.

Fold your jumping frog

Step 1 of 22

  1. Step 1: Fold in half

    Step 01

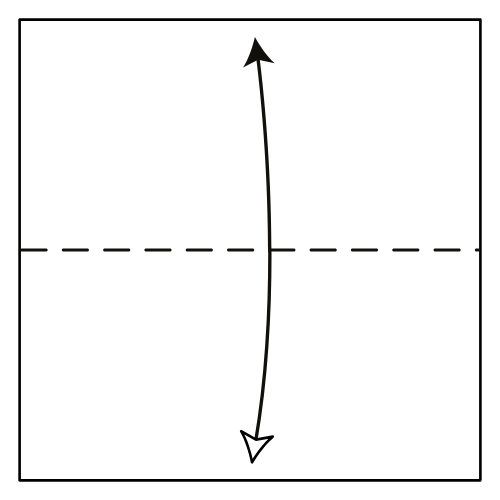
    Fold in half

    Start with the white side facing up. Fold the paper in half horizontally, then unfold.

    You should seeA square with one horizontal centre crease.

  2. Step 2: Fold vertically

    Step 02

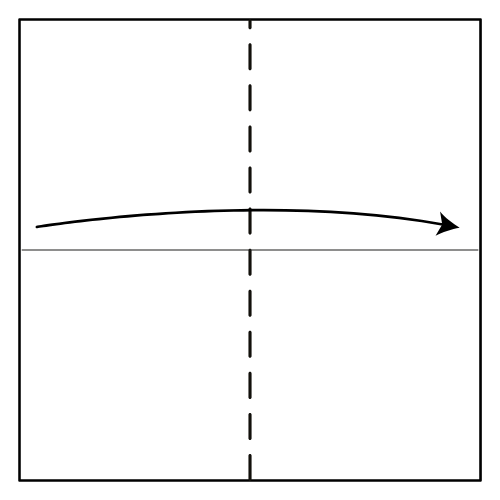
    Fold vertically

    Fold the paper in half vertically from left to right, then unfold.

    You should seeA square with horizontal and vertical centre creases.

  3. Step 3: Fold in half again

    Step 03

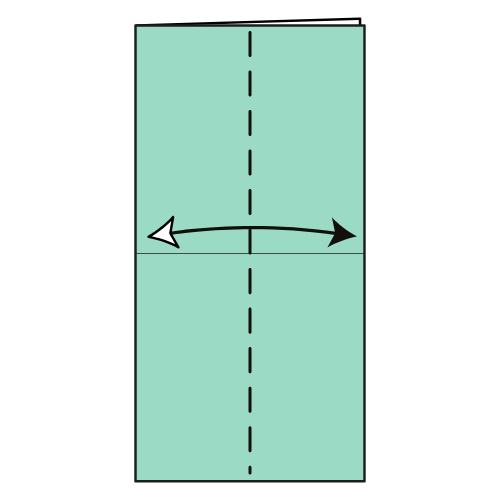
    Fold in half again

    Fold the paper in half horizontally again, then unfold.

    You should seeThe centre creases reinforced and clearly visible.

  4. Step 4: Crease the right corner

    Step 04

    Crease the right corner

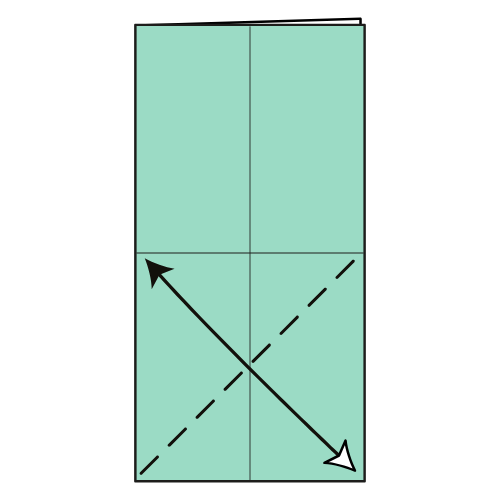
    Fold the bottom-right edge to the horizontal centreline. Crease well, then unfold.

    You should seeA diagonal guide crease running from the lower-right area.

  5. Step 5: Crease the left corner

    Step 05

    Crease the left corner

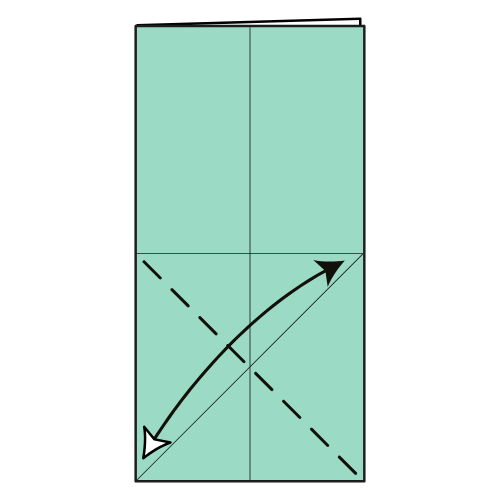
    Fold the bottom-left edge to the horizontal centreline. Crease well, then unfold.

    You should seeMatching diagonal guide creases on both lower sides.

  6. Step 6: Turn the paper over

    Step 06

    Turn the paper over

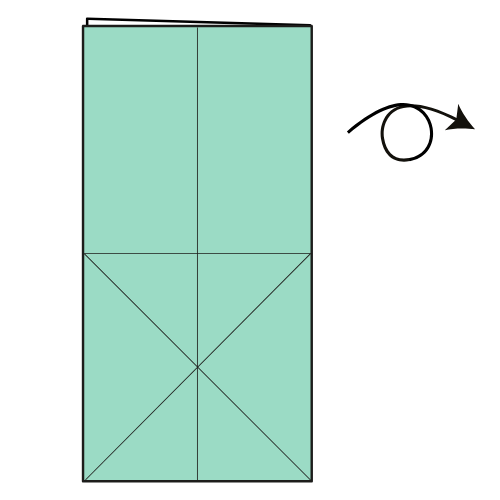
    Turn the paper over so the other side faces you.

    You should seeThe same rectangle with the lower guide creases showing through.

  7. Step 7: Crease the lower edge

    Step 07

    Crease the lower edge

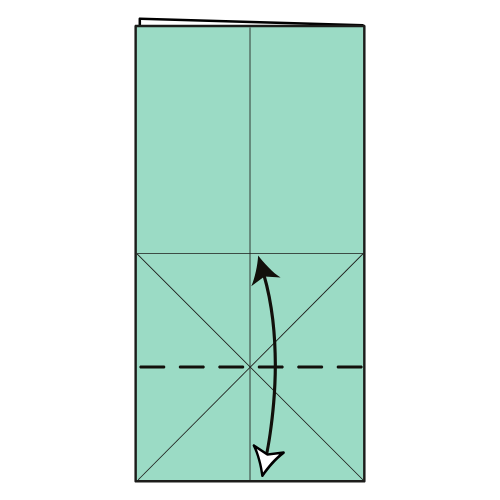
    Fold the bottom edge to the horizontal centreline. Crease well, then unfold.

    You should seeA new horizontal guide crease across the lower half.

  8. Step 8: Turn the paper over

    Step 08

    Turn the paper over

    Turn the paper over again.

    You should seeThe coloured side facing you, ready to collapse the lower section.

  9. Step 9: Collapse the lower section

    Step 09

    Collapse the lower section

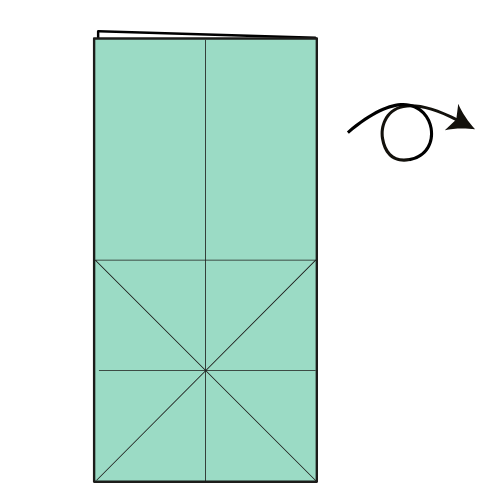
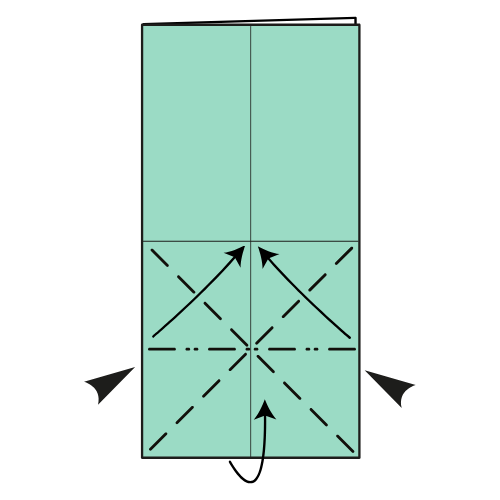
    Push the bottom left and right sides inward while folding the bottom edge up to meet the horizontal centreline.

    You should seeA layered lower section with two triangular flaps.

  10. Step 10: Fold the top flaps down

    Step 10

    Fold the top flaps down

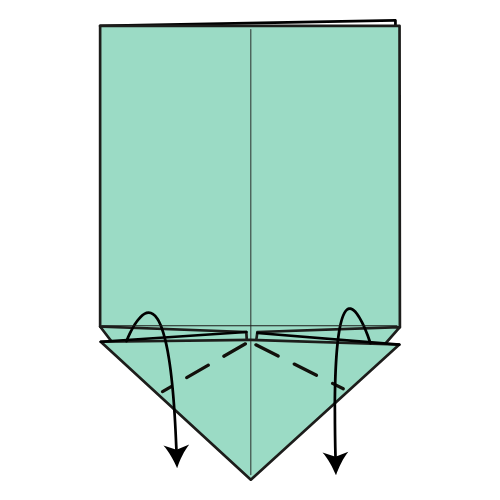
    Fold the top flaps downward. There are no exact reference points, so make the frog's front legs symmetrical.

    You should seeTwo matching front legs below the top section.

  11. Step 11: Rotate the model

    Step 11

    Rotate the model

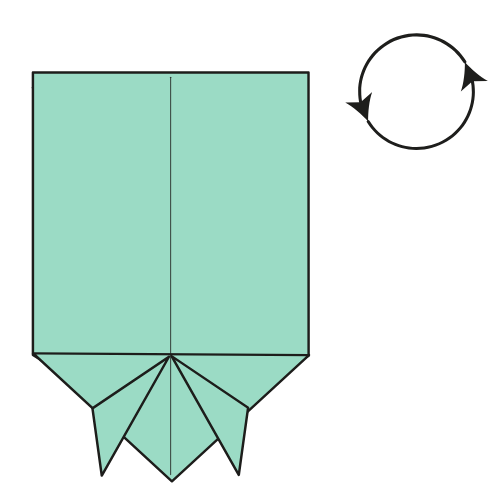
    Rotate the model 180 degrees.

    You should seeThe front legs at the top and the broad body below.

  12. Step 12: Fold the bottom edge up

    Step 12

    Fold the bottom edge up

    Fold the bottom edge up to the nearest horizontal line.

    You should seeThe lower rectangle shortened by a horizontal fold.

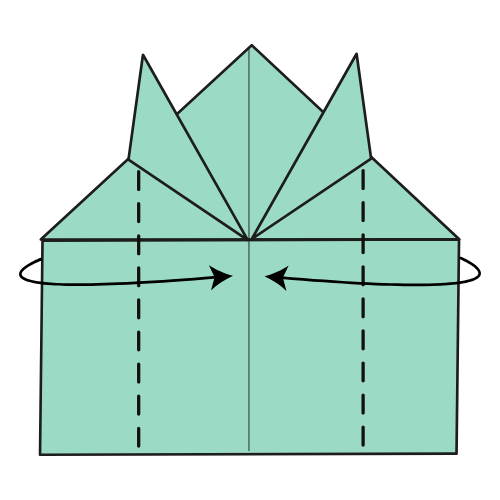
  13. Step 13: Fold the sides inward

    Step 13

    Fold the sides inward

    Fold the left and right edges to the vertical centreline.

    You should seeA narrow centre section beneath the front legs.

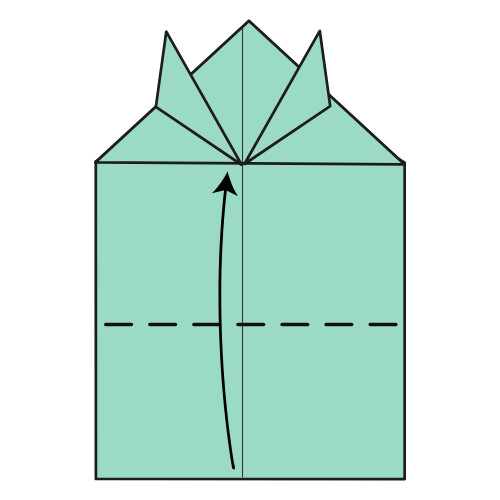
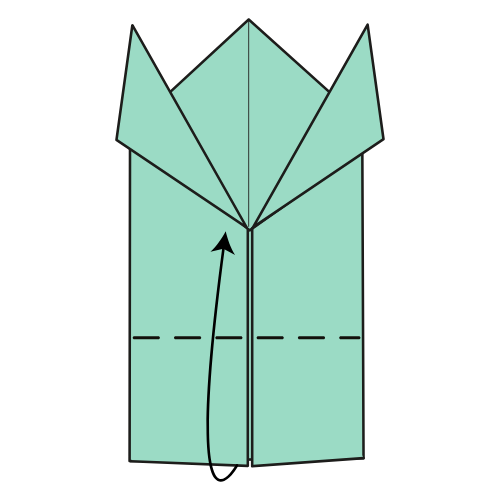
  14. Step 14: Bring the bottom edge up

    Step 14

    Bring the bottom edge up

    Fold the bottom edge up to meet the point where the front legs connect.

    You should seeA compact body with the front legs meeting at its top.

  15. Step 15: Make guide creases

    Step 15

    Make guide creases

    Fold the left and right edges of the top flap down to the bottom edge, then unfold them.

    You should seeTwo diagonal guide creases on the top flap.

  16. Step 16: Unfold the top flap

    Step 16

    Unfold the top flap

    Unfold the top flap from step 14.

    You should seeThe top flap open, with its new guide creases visible.

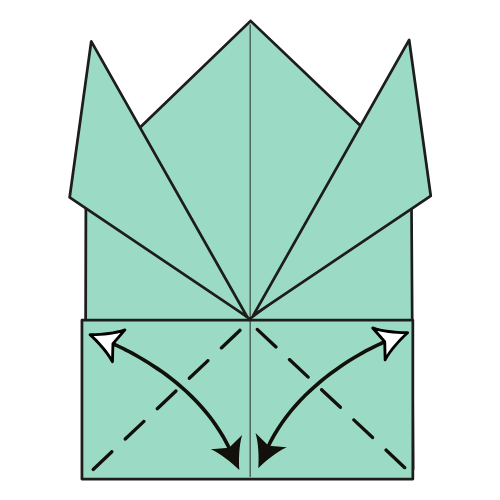
  17. Step 17: Open the back legs

    Step 17

    Open the back legs

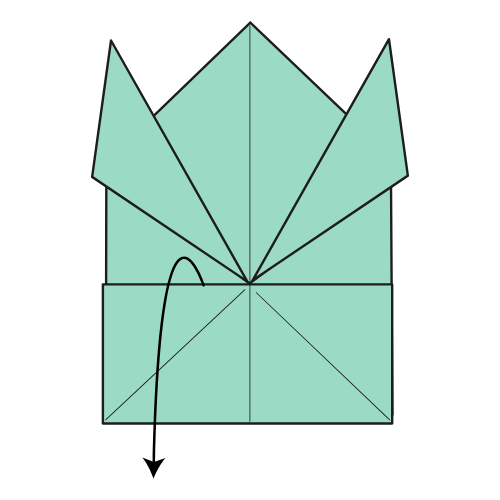
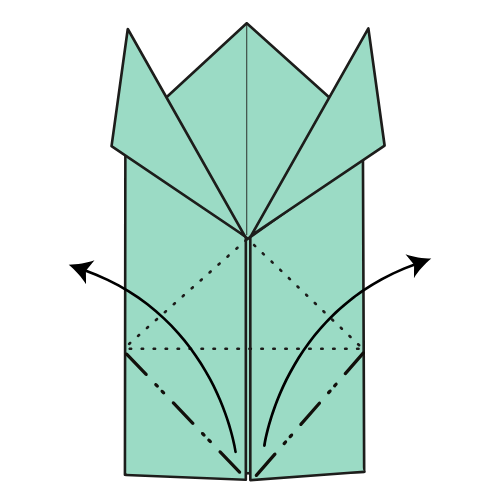
    Lift the bottom flaps and push the bottom edge up to meet the point where the front legs connect. The bottom flaps move outward on each side.

    You should seeTwo broad flaps extending outward to become the back legs.

  18. Step 18: Fold the side flaps down

    Step 18

    Fold the side flaps down

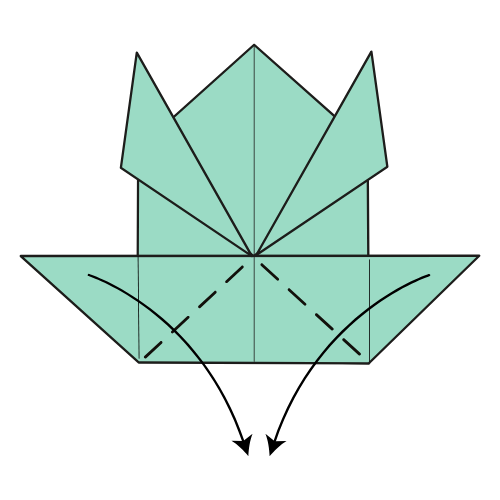
    Fold the left and right flaps down along the existing creases.

    You should seeThe wide back-leg flaps angled down on both sides.

  19. Step 19: Shape the back legs

    Step 19

    Shape the back legs

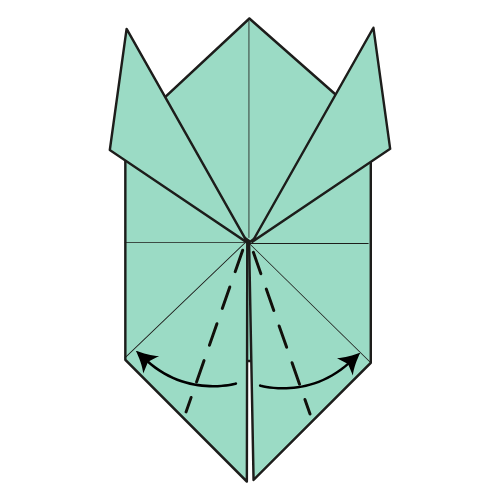
    Fold the inner edges of the bottom flaps to the nearest crease lines to form the frog's back legs.

    You should seeTwo pointed back legs, aligned symmetrically.

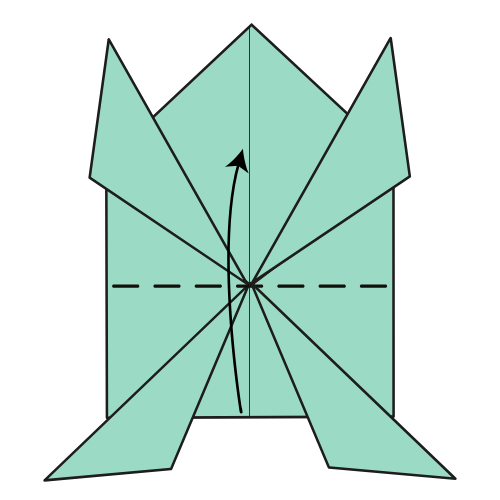
  20. Step 20: Fold up the bottom section

    Step 20

    Fold up the bottom section

    Fold the bottom section up along the line where the front and back legs meet.

    You should seeA frog shape with four legs gathered around the body.

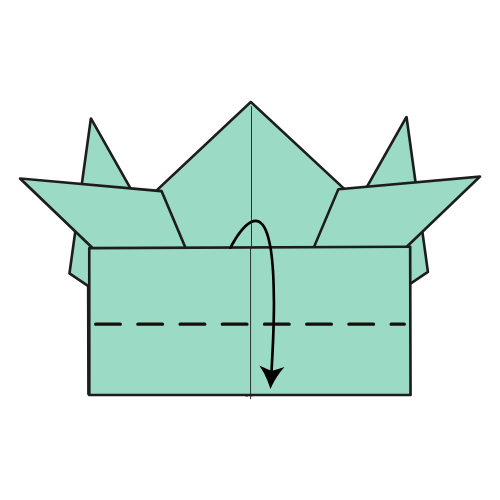
  21. Step 21: Crease the spring

    Step 21

    Crease the spring

    Fold the top flap in half from top to bottom. Crease well.

    You should seeA horizontal crease that gives the frog its spring.

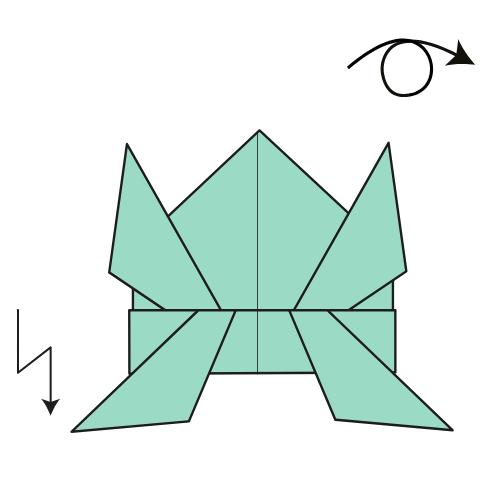
  22. Step 22: Turn over and stretch the legs

    Step 22

    Turn over and stretch the legs

    Turn the model over and gently stretch out the back legs.

    You should seeA finished frog with its back legs ready to push off.

Use the arrow keys to move between steps

Step 1 of 22: Fold in half

Completed green origami frog with four outstretched legs, ready to jump.

Your jumping frog is ready!

Put the frog on a flat surface, then gently press the back to make it jump.

Traditional design, diagrammed by Nick Robinson and published by Origami.me.

If the frog will not sit flat
Revisit step 20 and align the front and back legs before creasing.
If the layers resist opening
Ease the flaps apart instead of pulling them sharply.
If it will not jump
Stretch the back legs outward again after step 22.
More origami models