Kreativität in jeder Falte
Origami-Schwanz
Falte ein quadratisches Blatt in zehn Schritten zu einem anmutigen Schwan und beende es mit zwei angehobenen Falten, die Hals und Kopf formen.
- Sehr einfach
- 10 Schritte
- Etwa 8 Minuten
- 1 Quadratblatt
Papier: 1 6 × 6 in (15 × 15 cm) Quadrat vonKamiOrigami-Papier.
Geschrieben und geprüft vonInThink Guide team
Redaktionelle Überprüfung:14. September 2026
Bezug genommen: Origami.me
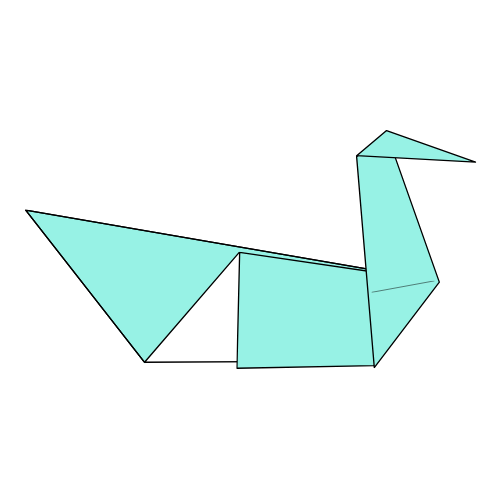
Dein Schwan ist bereit!
10
nummerierte Schritte vom Quadrat zum Schwan
2
Rundungen der Faltkanten zur Mitte
15 cm
QuadratKamiPapier
0
Teile, Leim oder Klebeband erforderlich
Bevor Sie folden
Die Diagramme verwenden Pfeile und Faltenmarken, um die Richtung jeder Bewegung anzuzeigen.
Gestrichelte Linie
Falte hier entlang. Die Linie verschwindet innerhalb des Modells einmal gefaltet.
gekrümmter Pfeil
Dies zeigt die Richtung, in die sich das Papier bewegt.
Volle Pfeile
Falten oder Drücken der angegebenen Schichten in diese Richtung.
Beschattung
Der schattierte Teil ist die Schicht, der Sie derzeit gegenüberstehen.
Die Schritte 7, 9 und 10 haben keinen genauen Bezugspunkt, also falten Sie sie auf die Position, die Ihnen am besten gefällt. Knusprige Falten halten den Hals stehen.
Falten Sie Ihren Schwan
Schritt1von10
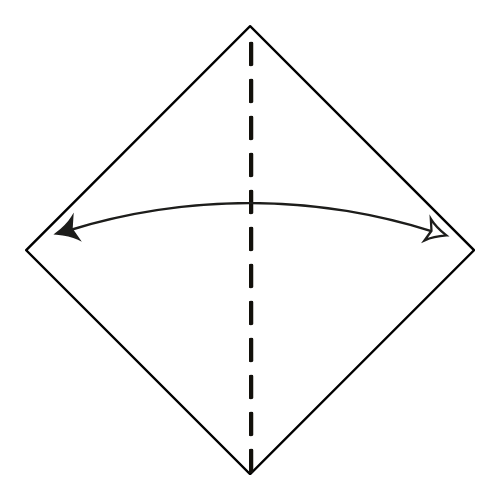
Schritt01
Machen Sie das Zentrum Falte
Beginnen Sie mit der weißen Seite nach oben in einer Diamantposition. Falten Sie das Papier vertikal in zwei Hälften und entfalten Sie sich dann, um eine Mittelfalte zu erzeugen.
Du solltest sehenEin flacher Diamant mit einer vertikalen Falte von der oberen Ecke zur unteren Ecke.
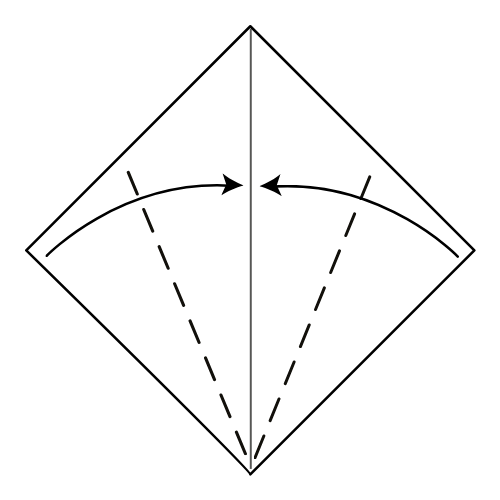
Schritt02
Falten Sie die unteren Ränder in
Falten Sie die unteren Ränder, um die vertikale Mittelfalte zu treffen.
Du solltest sehenDrachenform, wobei beide Unterkanten entlang der Mittellinie liegen.
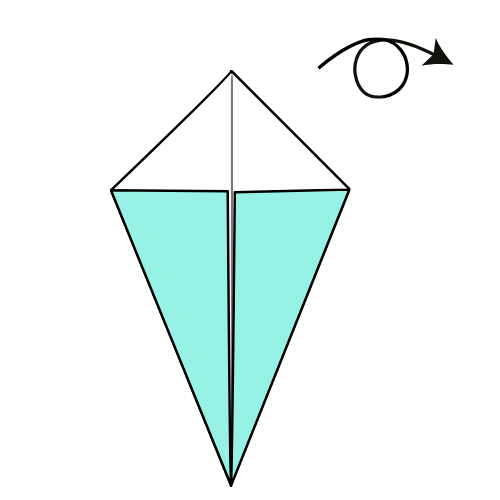
Schritt03
Drehen Sie das Papier um
Drehen Sie das Papier um.
Du solltest sehenDie gleiche Drachenform mit der farbigen Seite, die Ihnen zugewandt ist.
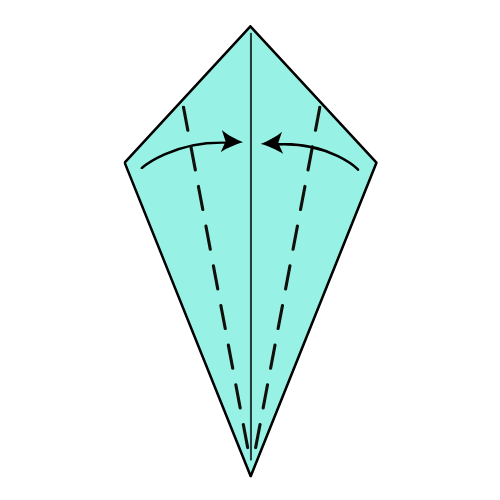
Schritt04
Falten Sie die unteren Ränder wieder ein
Falte die unteren Ränder wieder zur Mittelfalte.
Du solltest sehenEin schmalerer Kite, schlanker als die Form, mit der Sie diesen Schritt begonnen haben.
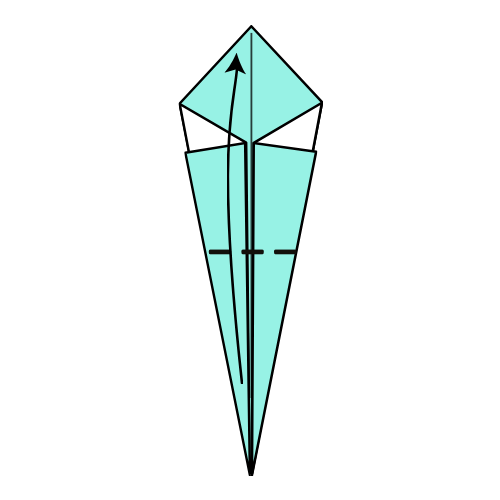
Schritt05
Falte die untere Ecke nach oben
Falte die untere Ecke nach oben, um die obere Ecke zu treffen.
Du solltest sehenEine lange schmale Form mit dem unteren Punkt bis zum oberen Punkt gebracht.
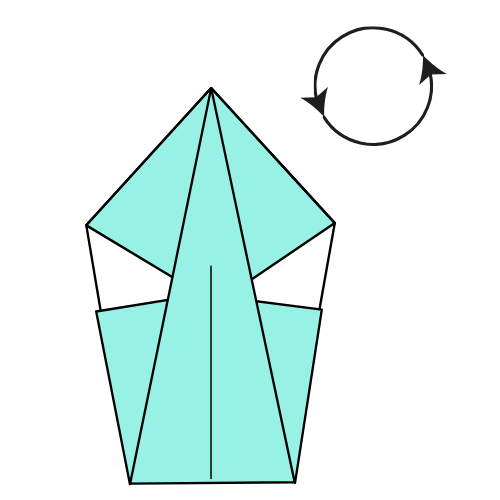
Schritt06
Drehen Sie das Modell
Drehen Sie das Papier um 90° gegen den Uhrzeigersinn.
Du solltest sehenDie gleiche Form liegt auf der Seite, mit dem Punkt nach links.
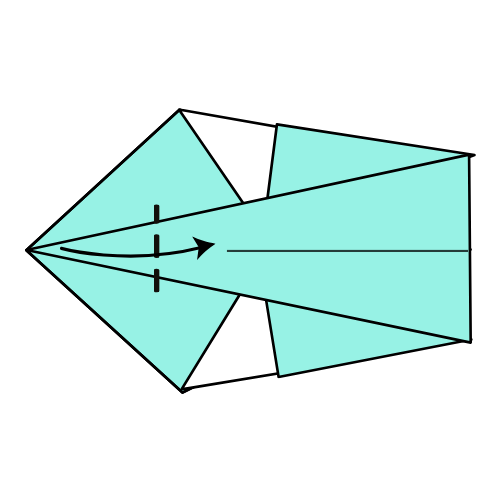
Schritt07
Falte die Kopfklappe quer
Falte die linke Ecke der oberen Klappe nach rechts. Es gibt keinen genauen Bezugspunkt, also falten Sie ihn auf Ihre bevorzugte Position. Das wird der Kopf des Schwans.
Du solltest sehenEine kleine spitze Klappe nach rechts zurückgeklappt, bereit, den Kopf zu werden.
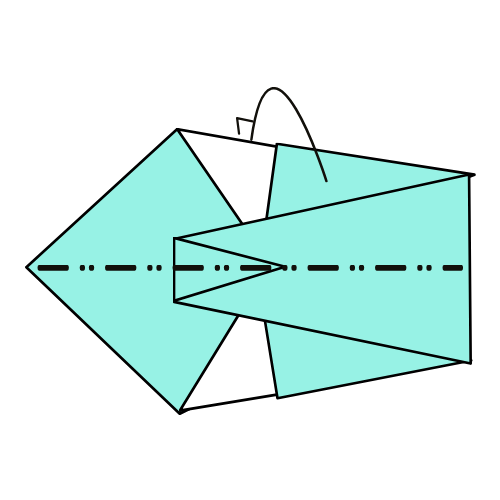
Schritt08
Mountain Fold zur Hälfte
Mountain faltet den oberen Abschnitt zur Rückseite des Modells und faltet ihn in zwei Hälften.
Du solltest sehenDas Modell halbierte sich entlang seiner Länge, wobei beide Seiten zusammenpassten.
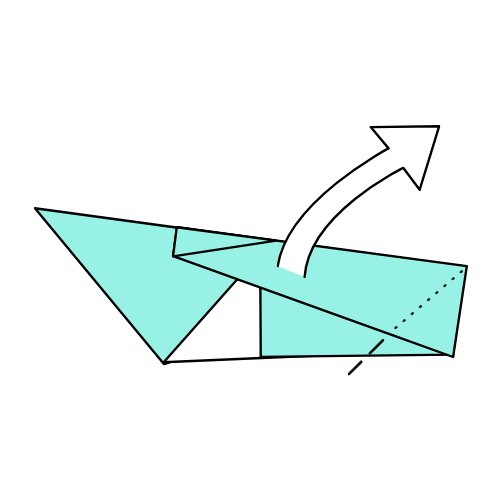
Schritt09
Heben Sie den Hals
Ziehen Sie den Schwanenhals nach oben, passen Sie den Winkel nach Ihren Wünschen an und glätten Sie dann das Papier ab.
Du solltest sehenDer Hals steht vom Körper auf, mit einer neuen Falte, die den Winkel hält.
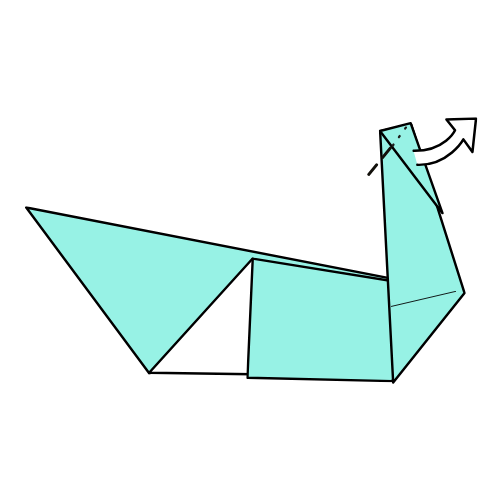
Schritt10
Heben Sie den Kopf
Wiederholen Sie den gleichen Vorgang für den Kopf des Schwans. Heben Sie es an, passen Sie den Winkel nach Ihren Wünschen an und glätten Sie ihn dann ab.
Du solltest sehenEin fertiger Schwan mit einem erhöhten Hals und einem kleinen Kopf, der oben gekippt ist.
Verwenden Sie die Pfeiltasten, um zwischen den Schritten zu bewegen
Schritt1von10: Machen Sie das Zentrum Falte
Dein Schwan ist bereit!
Stellen Sie den Winkel des Halses und des Kopfes ein, bis der Schwan ausgeglichen ist, und ebnen Sie dann jede Falte, um ihre Form zu halten.
Traditionelles Design, gezeichnet von Nick Robinson und veröffentlicht vonOrigami.me.
- Wenn der Schwan nicht steht
- Öffnen Sie die Basis leicht entlang der Stufe 8 Bergfalte, so dass sich die beiden Hälften auseinander ausbreiten.
- Wenn der Hals reißt, wie Sie es heben
- Lösen Sie die Falte ein wenig auf und ziehen Sie den Hals langsamer nach oben, bevor Sie ihn wieder abflachen.
- Wenn sich der Nacken zu einer Seite neigt
- Öffne die Stufe 9 wieder und hebe den Hals wieder an und halte ihn direkt am Körper.